We remain fully operational. Our teams are working around the clock to ensure your deliveries continue safely.

Descargar la aplicación


Servicios al cliente
Sobre nosotros
Copyright © 2025 Desertcart Holdings Limited
Descargar la aplicación
Buy anything from 5,000+ international stores. One checkout price. No surprise fees. Join 2M+ shoppers on Desertcart.
Desertcart purchases this item on your behalf and handles shipping, customs, and support to Uruguay.
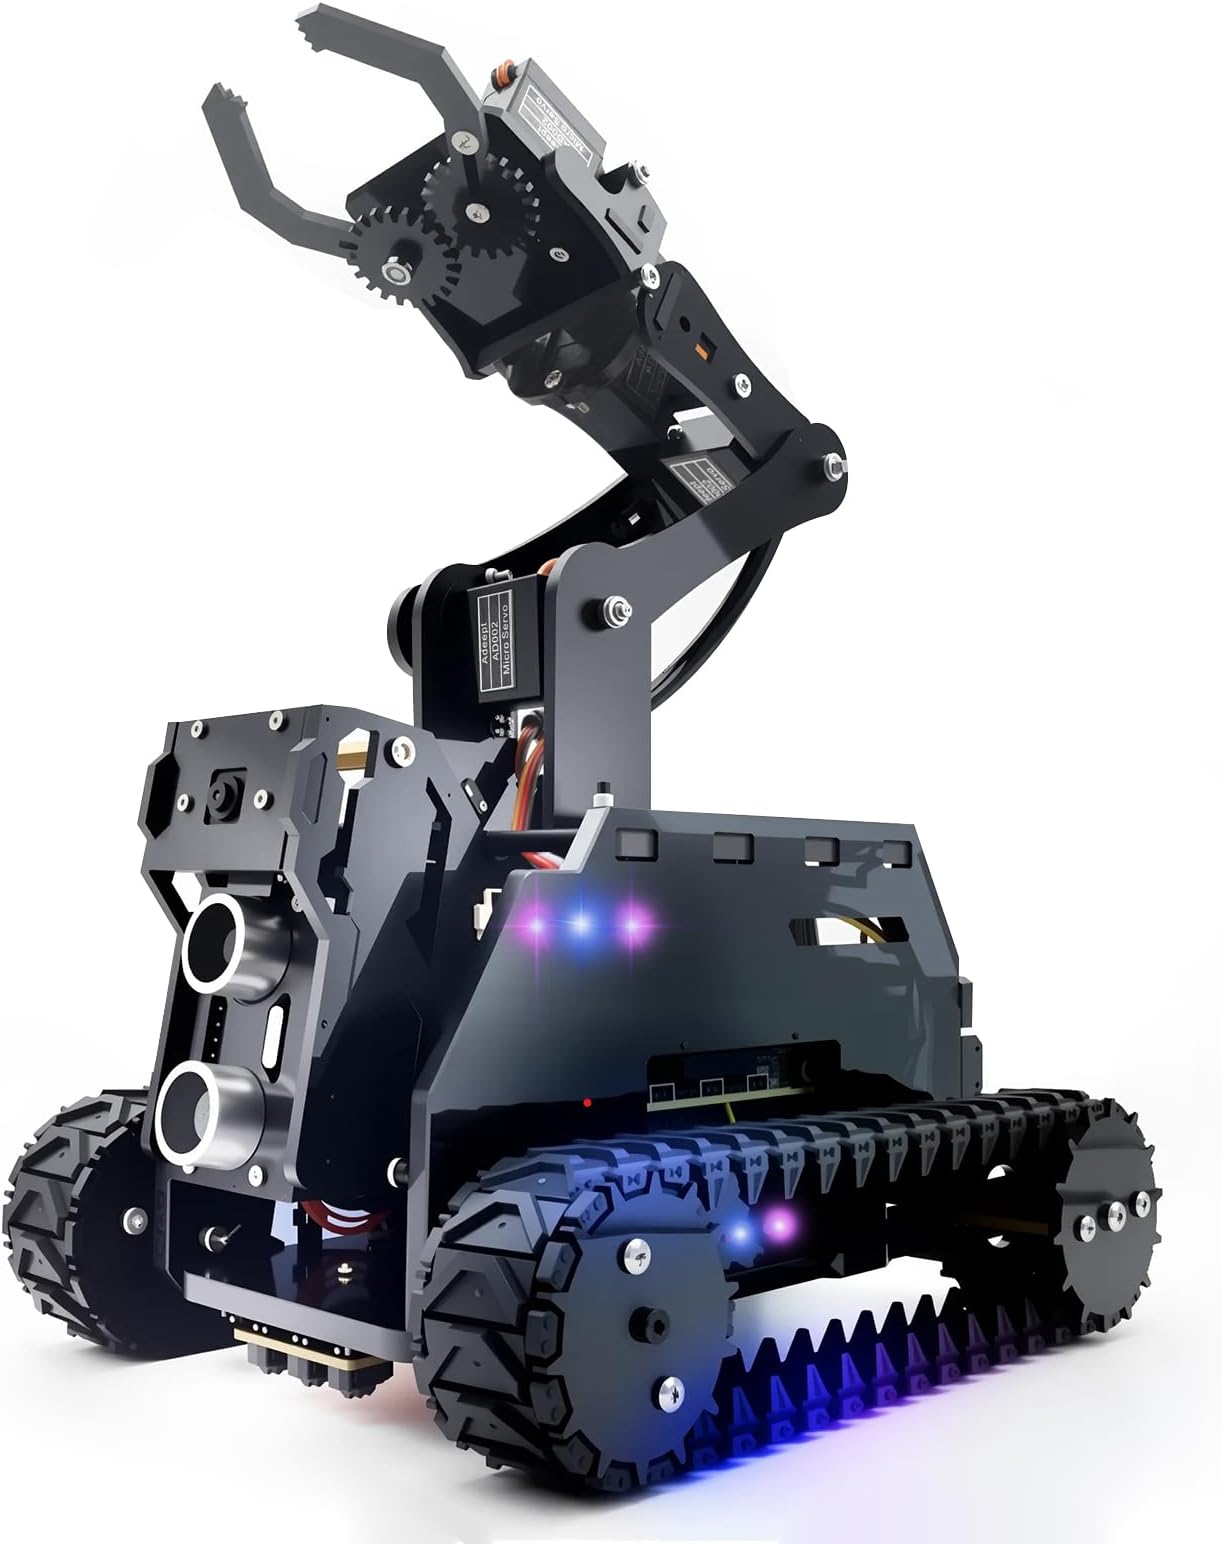
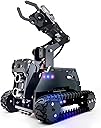
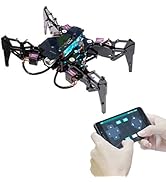
🚀 Elevate your DIY robotics game with the Adeept RaspTank – where innovation meets hands-on mastery!
The Adeept RaspTank is a WiFi-enabled smart robot car kit designed for Raspberry Pi 4/3B/3B+ users, featuring a 4-DOF robotic arm, OpenCV-based object recognition and tracking, real-time video transmission, and customizable RGB LEDs. It offers a comprehensive STEM learning experience with detailed assembly instructions and coding support, perfect for millennial professionals eager to upskill in robotics and programming.


| ASIN | B085C6Q48P |
| Age Range Description | 14+ |
| Animal Theme | Programming Robotic Arm Kit |
| Are Batteries Required | Yes |
| Best Sellers Rank | 256,859 in Toys & Games ( See Top 100 in Toys & Games ) 340 in Toy Robots |
| Brand Name | Adeept |
| Collection Name | RaspTank |
| Colour | Black |
| Country Of Origin | China |
| Customer Package Type | standard package |
| Customer Reviews | 3.6 3.6 out of 5 stars (267) |
| Educational Objective | Learn and apply STEM skills, particularly robotics and programming |
| Global Trade Identification Number | 00791137991414 |
| Is Assembly Required | Yes |
| Is Autographed | No |
| Item Dimensions | 16.1 x 6.3 x 22.9 centimetres |
| Item Dimensions L x W x H | 16.1L x 6.3W x 22.9H centimetres |
| Item Weight | 950 Grams |
| Manufacturer | Adeept |
| Manufacturer Part Number | ADR013 |
| Material Type | Acrylic, Polycarbonate |
| Maximum Age Recommendation | 960.0 |
| Minimum Age Recommendation | 144.0 |
| Model Name | ADR013 |
| Model Number | ADR013 |
| Number of Pieces | 4 |
| Occasion | DIY, STEM |
| Operation Mode | Automatic |
| Outer Material | Acrylic, Polycarbonate |
| Play Activity Location | Tabletop |
| Power Source | Battery |
| Recommended Uses For Product | Educational - Programming learning, robotics and electronics, DIY robotics projects, Hobbies - Robot construction and customization |
| Scale | true size |
| Set Name | RaspTank |
| Size | 9.01 x 6.33 x 2.48 inches |
| Special Features | Light |
| Style | Modern |
| Sub Brand | Adeept |
| Supported Battery Types | Lithium-Ion |
| Theme | DIY/STEM Programming Educational Robot Kit |
| Toy Figure Type | Action Figure |
| UPC | 791137991414 745780190748 |
| Unit Count | 1.0 count |
| character | DIY/STEM Programming Educational Robot Kit |
M**N
Great Little Robot Kit - Dont expect it to bring you a beer/coke
All in all, a great little robot with some nice electronics. Entertained us for about a day and half to build it. - Ignore the flimsy instruction sheet that comes, and download the pdf with the full instructions https://www.adeept.com/video/static1/itemsfile/Tutorial_12-11.pdf -Download the full raspian image (gui and all) as the lite one doesnt work (missing some packages) you can setup the wifi network using the file suggested on the instructions direct to the sd card to avoid keyboard/monitor being needed - On Windows use notepad++ to write the wifi file to sd, normal windows notepad puts line feeds in and while it looks ok in windows, the pi will not read it Their script that downloads everything and sets it all up works perfectly if you use the full gui raspian image attach the servo cables as instructed right at the start to get the pi working and allow it to set the servos to centre. Dont worry about the led light wiring until the diagrams later which show it explicitly we snapped a servo collar piece when removing it from the laser cut sheet - dont worry there are 3 extra ones provided When assembling the final side pieces (large plates) turn robot on its side, to allow you to balance the nut in the opening to screw then on otherwise nut will drop out and inside the robot, otherwise you will need about 5 hands. -Right motor is motor 2, left is motor 1 - insert cables at the same time as you attach all the servos during final nightmare assembly. pass the servo cables through the top plate before connecting then to the board or you will have to undo them from the board. - Our camera had the ribbon at the bottom rather than the top, else image is upside down its plenty long enough to bend gently over the top of the camera bracket - Use the servo extender cable for the gripper servo or the wires are not long enough to assemble the robot fully cable management is a nightmare, especially care with the camera ribbon as its fragile, and tucking the servo cables down the sides of the pi to allow the top place to be placed in the right place If you find the motors drive really nice, but the servos are really slow and jerky, check one of them isnt jammed against the end of its travel - the servos will use all their strength to hold position regardless of whether the joints allow it, and will use all the servo power - shut off robot and check all servos can move by hand (you cant do this with the power on as they hold fast in place) Elbow and shoulder motors seem blended together as there is no separate elbow control buttons, this still works though but you cant manually direct the elbow motor. It cant really grip anything substantial, so forget having it bring you a beer. - Arm up/down seems to be the camera/ultrasonics on ours, 'hand up/down' is the shoulder and elbow - The collars that attach the driven wheels to the motors have their holes cut too large for the spindle on the motors, resulting in it being hard to centre then on the shafts, they could have made the hole smaller and only needed one grub screw, so the driven wheels look a little buckled when they turn - not a major issue. - Dont forget that the SD card is buried deep within the bowels of the robot, you wont be able to get it out after assembley! Software is actually quite advanced, there is scope here for hours of development and tweaking, on a great little fully featured platform.
L**Y
THERE IS A BIG PROBLEM: SOFTWARE!!!
WARNING! This is not plug and play! The robot comes in tens of pieces that need to be assembled. Electronic components, plastic components and software needs to work together. That is the issue, the software part of the build. In order for this robot to work you rely on third party software in order to connect remotely to the Raspberry pi. You connect via a protocol called SSH. I am a Compsci student so I like to tinker with hardware and software but the whole process of connecting to Raspberry Pi was really difficult. So long story short I haven't finished the assembly and software installation...I have better things to do. In conclusion: I wouldn't recommend this product. So you pay 80 something £ for this kit and on top of that you will need a Raspberry Pi which will add another 120£ at least, plus an additional set of 18650 batteries plus a charger for them, so another 50£. So you will end up spending close to 300£ for something that will frustrate you over the top because they have neglected the most important part of this product which is software. If they would provide a better, integrated solution for this, like a downloadable image of raspbian with all the settings enabled and with a Python program as the interface then, yeah, I would give it a go, but as it is now, No. A strong No. Have a nice day!
J**N
Should be great, but overstretched
On the face of it this kit is great, it takes a while to put together but following the downloaded pdf, with a few common sense changes I got a working robot. That's where it ends. It's too small for what is packed in. The case is packed with wires, including a ribbon cable for the camera, so there's no ventilation, my Pi3 overheats. Also because of the cable, the front camera servo frequently gets snarled up and doesn't work. Very quickly two of the servos burnt out, not lifting anything other than the weight of the arm, but the connections for these is at the base of the robot, so to replace them, the whole robot has to be disassembled. That's when I gave up on the base kit, I'm remaking the main body 2cm wider to provide space and ventilation, and replacing the basic small servos with better ones. Also fitting servo extension cables so it doesn't have to be disassembled in future! The good side to this robot, is that the acrylic body is very well cut, the Adeept Robot controller card is excellent and the software well thought out, though the OpenCV instructions are quickly sabotaged by the advances in software. As a basic kit, it's not very good and needs an enthusiast to make it successfully, needs better servos and more internal space.
R**F
Le produit est de très mauvaise qualité. Une pièce principale s'est cassée facilement lors du montage. Il y a très peu de place pour le passage des cables et causent beaucoup de pression sur l'ensemble. Le vissage des éléments est complexes et demandent beaucoup de doigtée.
S**N
I got it on 19th this mount... still struggling on software install. During the installation I can see some errors appear and every time restarts/which is normal on the end of the install/, but with no success. That's why I keep it disassembled. I am waiting for install with no errors to put the RobotHat and camera cable for final touch... I've tried almost everything, but will not stop till I get it on move!
N**S
Agréable montage, fromage que le module de commande soit à acheter en plus
F**O
Was fun to build! Looking forward to purchasing more!
G**I
L'oggetto è BELLO e (alla fine) FUNZIONA BENE ... MA: 1. le istruzioni non ci sono: sulla scatola è indicato di cercarle nel file "detail-34.html" sul sito adeept.com (nella sezione "Learn"), ma ... il FILE NON C'E' e, al suo posto OCCORRE SCARICARE "RaspTank Smart Robot Car" (ma nessuno lo dice); 2. (se non siete dei modellisti esperti) ricordatevi di azzerare i servomotori PRIMA di montarli (è scritto chiaramente nelle istruzioni ... ma alla fine, DOPO le dettagliate istruzioni per il montaggio dei componenti e per l'assemblaggio finale); 3. quando avrete montato tutti i componenti, armatevi di TANTA PAZIENZA, perché l'assemblaggio finale (in particolare riguardo a dove far passare e dove mettere i cavi, in totale assenza di istruzioni) è un vero incubo, per non parlare del fissaggio delle pareti del RaspTank (i piccoli dadi, necessari per bloccare le viti di fissaggio, cascano immancabilmente all'interno quando si cerca di "abboccarli" alla propria vite ... e ci sono 6 coppie dado-vite); 4. per arrivare in fondo, è FONDAMENTALE conoscere bene il Raspberry Pi e SOPRATTUTTO il sistema operativo RASBIAN perché vi può capitare (come a me) che il moto avanti ed indietro del RaspTank siano invertiti (la possibilità è segnalata nelle istruzioni ...) e quindi DOVRETE MODIFICARE il PROGRAMMA nascente di Adeept (che avevate precedentemente installato nel Raspberry Pi): per farlo dovrete collegare il Raspberry Pi ad un monitor, ad una tastiera e ad un mouse ... e alimentarlo; 5. ... vi occorre comprare anche un Raspberry Pi, con una scheda micro SD ... perché NON SONO COMPRESI NELLA SCATOLA.
Trustpilot
Hace 1 semana
Hace 3 semanas