
Descargar la aplicación


Servicios al cliente
Sobre nosotros
Copyright © 2025 Desertcart Holdings Limited
Descargar la aplicación

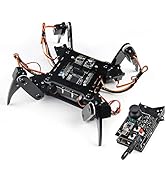
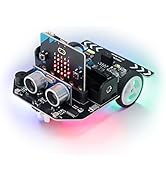
🐾 Build the future of robotics—one paw at a time!
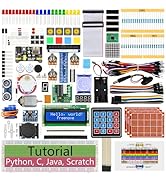
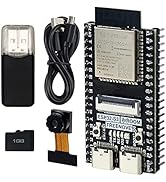
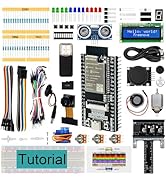
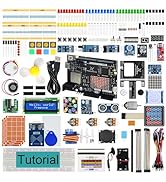
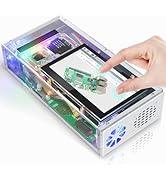
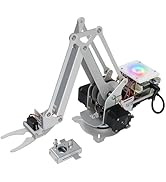
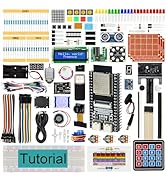
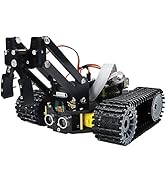
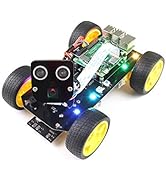
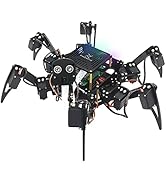
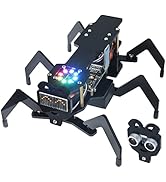
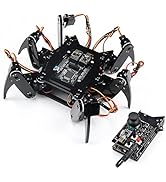
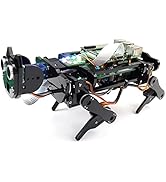
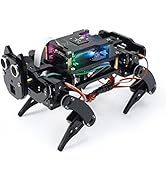
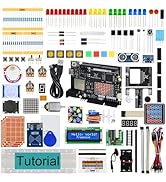
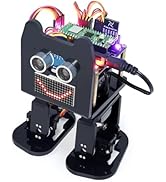
The FREENOVE Robot Dog Kit is a sophisticated DIY robotic pet powered by 12 servo motors, a rotatable camera with face recognition, and an ultrasonic sensor for obstacle detection. Designed for Raspberry Pi enthusiasts, it offers wireless control via mobile and desktop apps, comprehensive Python tutorials, and open-source software for endless customization. Ideal for tech-savvy millennials seeking a hands-on, educational, and expandable robotics experience.


| ASIN | B08C254F73 |
| Best Sellers Rank | 215,096 in Toys & Games ( See Top 100 in Toys & Games ) 61 in Robot Model Building Kits |
| Guaranteed software updates until | unknown |
| Item model number | FNK0050 |
| Manufacturer | Freenove |
| Product Dimensions | 10 x 1 x 15 cm; 970 g |
N**K
Great kit! Excellent tutorial. Don't be put off if you aren't an expert!
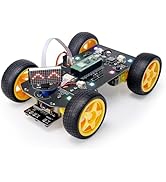
I can't say enough good things about this kit... Although I definitely think it looks more like a cat than a dog. I saw a comment saying it took 3 or 4 hours. Well, I'd budget for more like a full day. We had it up and running in 12 hours with two hour long breaks for lunch and dinner. With younger kids you may want to aim for a weekend build just so you don't have to rush and you don't overwhelm them. We made a few mistakes along the way which is probably about par for the course and is an important part of the learning progress. All were easily rectified. I was building the kit with a 14 year old and a 16 year old. They did everything really, I was just there to supervise and explain and hopefully teach a bit. I work with computers but don't get me wrong, you don't need to be particularly techy to do the same. I'm not from a Linux background and I'm only just beginning to learn Python. (This was the first pi I'd used and I'm addicted now, I've bought a Pi400, another Pi4 and a Pi Zero for different projects since this one!) I do mainly BI and have done web front end development in a former life but, really, any competent adult could guide kids through the build... The tutorial is almost perfect. Just make sure you read it well and maybe try out some of the early steps yourself first to familiarise yourself with what's required. Don't forget, you need to buy the pi and the batteries separately. We used a Pi4B ad I got 20A "high drain" 3000mah 18650 batteries and charger. You might be better off with a different battery, I don't know, but these work. The batteries don't last for that long but long enough to get some good use before you have to charge them again. You also need a power supply for the pi and a micro sd card (plus reader). You can get that all on amazon or from the pi hut. I'd recommend getting the book "Official Raspberry Pi Beginners Guide" as it will get you up to speed quickly and it has lots of little projects you can do separately to the robot build. *** You need a good large hard surface to operate the robot. It's legs don't work well on carpet. The video I've attached shows it walking around a dining room table. It's a more satisfying build than the 4wd card I think. I bought the car for them to build on their own after we built the robot dog and they managed it with only a little extra help from me. Remember to be careful when you connect the ultrasonic sensor and the camera. If you put the connectors in the wrong way you could burn them out. The ultrasonic sensor on the $wd car got burned out when they plugged the connector in the wrong way - it was only £2 plus delivery for a replacement and I needed to place an order anyway so no worries. A friend of mine has a 6 year old who already builds tough lego projects and a petrol remote control car so I've recommended this kit to his dad. Never too early I reckon! Can't wait till my boy is old enough for these projects. *** Remember, this is not just a robot... You can simply plug use the power adapter and plug it into a monitor and it's a full desktop pc. You can install retropie on it and have every games console from the beginning of time to the Dreamcast running roms on it. You can use it as a programming workstation for learning and developing in multiple languages. You can even just use it for browsing the internet, watching videos on YouTube, word processing, etc, etc. It's such a versatile piece of kit. It has lots of good code on it. The controller android/iphone app is brilliant. Really cool. Shows you the camera view and allows you to remote control all the built in functions on the robot. And you can write programs for it! It has the ultrasonic sensor for obstacle avoidance and the LEDs and the buzzer can be incorporated into programs you write. I'm thinking of putting a speaker and microphone on it so we can voice automate it! We've barely even scratched the surface of what we can do with it. You can learn a great deal if you can imagine some cool things for it to do. I haven't even mentioned the facial recognition and the ball tracking. Python is a brilliant language for kids to learn. Maybe try some scratch with them before you get into too much python but that's all covered in the beginners guide book. This could be your kid's route into a whole new hobby, which could lead to a worthwhile career. Who knows! The world is your lobster! Buy it! Build it! Enjoy it! (I have absolutely no affiliation with the company! I'm just very impressed by what they offer here. I could write pages probably but I'll leave it there!) It's definitely more of a robot cat :) My cats agree.
J**N
Enjoyful adventure, great prospect.
I bought the Dog for my 8-year old son after we had some positive experience of the Freenove packaged kits. Overall, the RoboDog is 1) of high quality, 2) with the manual easy to construct, 3) the support is swift, 4) engaging to learn, and lastly, 5) an open platform suitable for extension. Thus, I'm very satisfied, the hardware components alone have a high value. The construction time is about 3-4 hours. The manual is detailed and explains everything in detail. The nuts/screws are nicely packaged in individual packages and labeled with pictures, it is fun to manufacture the robot using the materials. A little bit tedious to calibrate and mount the 13 servos. Removing the covers of the acryl elements we found easiest using fingernails. We followed the steps in the manual carefully comparing the result of each construction. I recommend checking the photos on the product page for the final organization of the cabling. The LCLEBM batteries (can be found here on Amazon) just work fine, the batteries can be charged in the Dog using the USB cable provided (but requires a USB power adapter). I had one question during the setp, the support was replying swiftly. The code on GitHub is under active development, but anyone has the potential to improve the (software) capabilities of the robo dog by tinkering with the provided (OpenSource) software. It provides a good basis to integrate machine learning (uses OpenCV) and building more sophisticated programs. The effective usage of the kit requires knowledge of programming (Python if the existing code base is extended), Linux, and the Raspberry Pi environment. I believe this can be learned effectively by 14+-year-olds otherwise an adult must support the development. Once the initial system is working, compared to standard toys such as Lego though, the potential of the Robo Dog kit is much higher as many sophisticated mini-projects come to mind. There are various I/O pins of the Raspberry pi available to augment the RoboDog even further! We are looking forward to the adventures that await by extending the program or adding new hardware capabilities (such as a mini speaker and making it bark).
A**A
Incredible
What an incredible kit. This is my first adventure into building a robot. But I have to say I absolutely love it. I'm still a long way off getting it fully functional but so far the build has been really enjoyable. The package contains all the bits and pieces you need, minus the PI and batteries. They even include a spare servo, frame parts and pleny of spare screws and fixings which is a great touch! The manual is very comprehensive and easy to follow. If you're a first time PI user like me don't be put off. It's reasonably easy to follow if you have a little time and patience and willingness to learn as you go along. I'll be integrating mine with an AI and some custom code to create some very interesting functionality. Though not necessary, it comes with a desktop and phone app and plenty of built in features to use the dog as it comes. Really impressive kit and a really fun learning experience. Well done Freenove. Really excited to get this fully operational
S**H
Good product worked as expected.
ま**ー
以前に、Freenove_Hexapod_Robot_Kit を購入し、 面白かったので、こちらも購入してみました。 マイコンボードRaspberry Piは付属しないので、少し高額になりますが、 私は、使用していないRaspberry Pi 3B+ を持っていたので、迷うことなく購入しました。 サポートは、迅速に対応してくれたので助かりました。 Raspberry Piの使用経験者またはLinuxの経験者であり、 ラジコンなどでサーボを使用したことのある方でしたら、 スムーズに完成まで たどり着けると思います。 ダウンロードしたファイルの場所(ファイルパス)が説明書と異なる場合、 ユーザー名が説明書と異なる場合など、ある程度のLinuxの知識は必要になると思います。 私が使用した機材などは、 Raspberry Pi 3B+ Windows10 パソコン Raspberry Pi OSは64ビットを使用しました。 2022-09-22-raspios-bullseye-arm64.img.xz 今はOSのインストールがとても簡単なことに気付きました。 ダウンロードしたファイルを実行するだけで、イメージャーが起動し、 後は指示に従うだけで、SDカードに書き込めます。 ここで使用する VNCサーバーやPythonなどは既にOSに含まれていましたので、 追加でインストールするものは何もありませんでした。 私はVNCを使って、Windows10マシンからRaspberry Piを操作しました。 (チュートリアルどおり) 以下、大まかな流れを説明します。 ここで使用するソフトウェアは、メーカーサイト、またはGitHubからダウンロードして使います。 本体を組み立てにあたって、サーボのニュートラル点を出す必要があります。 私はサーボテスターを持っていましたので、それを使用しました。 チュートリアルどおり では、各サーボを制御基板に接続し、 setup.py を実行します。 組み立て終了後、 test.py を実行して、配線などをチェックします。 正常であれば、 ロボット側で、main.py を実行し、 WindowsPC側でwindows.exeを実行し、LAN経由でロボットに接続します。 その後、 キャリブレーションなどの調整をします。 ロボットの操作は、パソコンやスマホからLAN経由で行います。 スマホには、メーカーが提供するアプリをインストールします。 Freenoveのキットには、必ず予備パーツが入っています。 このキットでは、 アクリルパーツが数点 サーボが1つ ボルト・ナット・ビスがそれぞれ数個 ですが、サーボが1つ不良品でした。 中を点検したら、モーターのはんだ付けがとれていました。 総合的に、 完成度の高いキットだと思います。特にチュートリアル(組立説明書)はよくできています。 また、サポートも迅速で良いと感じました。
M**T
It took me some time to put this robot dog together but it was a lot of fun. If you follow the tutorial most most steps are understandable and work well. If things are unclear you can always send a mail to the Freenove support team and they will usually answer already by the next morning. They are very helpful and have in one case even sent me a replacement board. Most difficulties I had with installing the right debian OS and later testing it. Once the camera software didn't work until finally I had to re-install the whole OS and then it worked. Installing the opencv software was a pain since there have been many changes recently and it took me some time to sort it all out. Some Linux troubleshooting skills are certainly helpful. Now the robot dog is all up and running and it can really walk forward, backward and sideways and there are a lot more things to explore. For example the dog can recognize a face and act on it. The tutorial encourages you to write new software and that will be the greatest fun part. I am looking into using some AI to improve the walking or follow or act on seeing some objects. If you like to explore a completely new robot type and have fun putting hardware and software together this is for you! Also a great example for practicing on Python on a practical example.
K**R
Instructions ok. Product quality ok. The perspex may break if one tries too hard. Just repair with superglue if breaks. But the servos were bad. I have 4 down and replacement came free but after a month still not delivered, perhaps due to covid. Ihad to spend another 100$ from amazon to try replace with diff brand s of servos... So what i mean is a finely designed product and very good customer service response, but somewhat servos gave me trouble. They are the lower end servos to begin with. They will heat up as a sign of failure. Presumably so for a basic kit of this price but could freenove do more qc for the servos at packing?
D**Z
Es entretenido de montar pero despues se disfruta haciendolo funcionar
Trustpilot
Hace 2 días
Hace 1 semana