
Descargar la aplicación


Servicios al cliente
Sobre nosotros
Copyright © 2025 Desertcart Holdings Limited
Descargar la aplicación
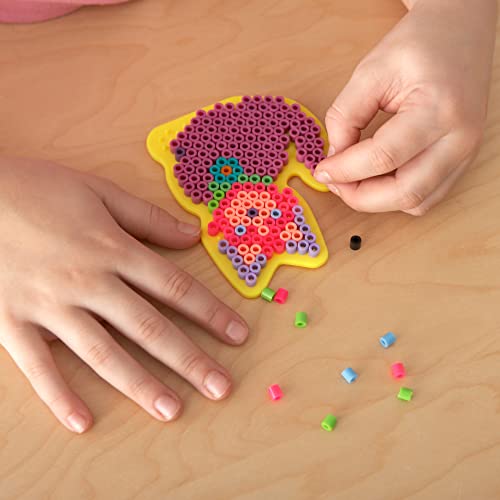

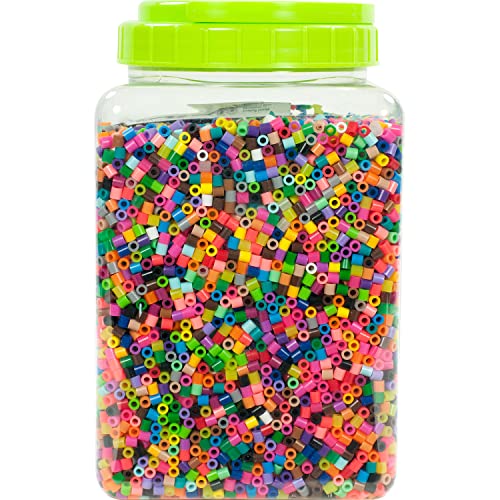
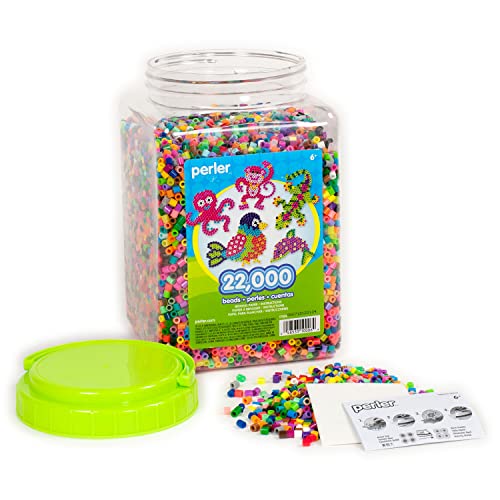
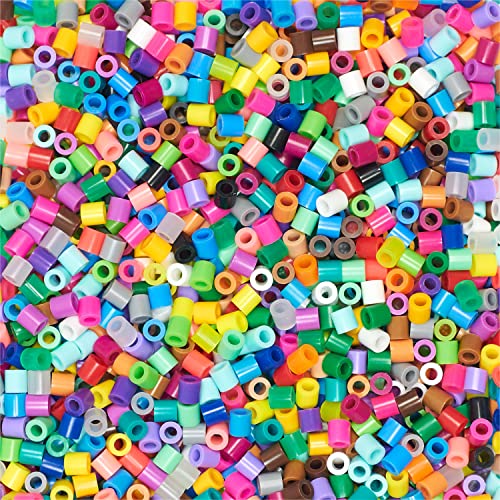
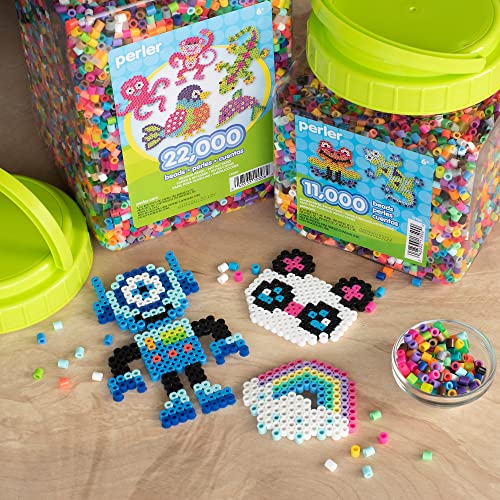

✨ Craft your colorful legacy with 22,000 beads of pure potential! 🎉
The Perler Beads Jar Multi-Mix Colors offers 22,000 high-quality plastic beads in a vibrant assortment, designed to enhance hand-eye coordination and color recognition for ages 5 and up. Compatible with Perler pegboards and ironing paper, this set is a must-have for creative professionals and hobbyists looking to elevate their crafting projects with endless design possibilities.


| ASIN | B000ZDME7Y |
| Assembly Required | No |
| Batteries Included | No |
| Batteries Required | No |
| Best Sellers Rank | #195,045 in Toys & Games ( See Top 100 in Toys & Games ) #50 in Fuse Beads #1,535 in Jewelry Making & Beadwork |
| Brand | Perler |
| Colour | multicolour |
| Country of Origin | USA |
| Customer Reviews | 4.8 4.8 out of 5 stars (9,163) |
| Date First Available | 7 August 2012 |
| Generic Name | beads |
| Global Trade Identification Number | 00048533100064 |
| Item Dimensions LxWxH | 22.9 x 13.9 x 14 Centimeters |
| Item Weight | 1 kg 540 g |
| Item model number | 17000 |
| Language | English |
| Manufacturer | Perler |
| Manufacturer recommended age | 5 - 12 years |
| Material | Plastic |
| Material Type(s) | Plastic |
| Model Number | 17000 |
| Net Quantity | 1.0 Count |
| Number of Pieces | 22000 |
| Product Dimensions | 22.86 x 13.92 x 13.97 cm; 1.54 kg |
| Shape | Round |
| Size | 1 pack |
| UPC | 048533100064 |
A**R
Beads rocks
Great product Love it I want separately packed packages for every color. I want near by 50,000 beads, plz available it on Amazon, and plz reduce some price, atleast price as before ..U increased the price. Plz add more beads packages. M really looking forward to buy these from u
A**R
Rabiya
I want cod option for this product
A**Y
Im worried I dnt get the same product
I dnt get dis product
C**R
No pegboards included
The beads are useless unless you already have pegboards from before. The Q&A suggests pegboards are included, they are not.
N**N
Fantastic idea to keep the kids busy, sorting and creating
A**E
it has wide range of color assortment, vibrant and bright
A**R
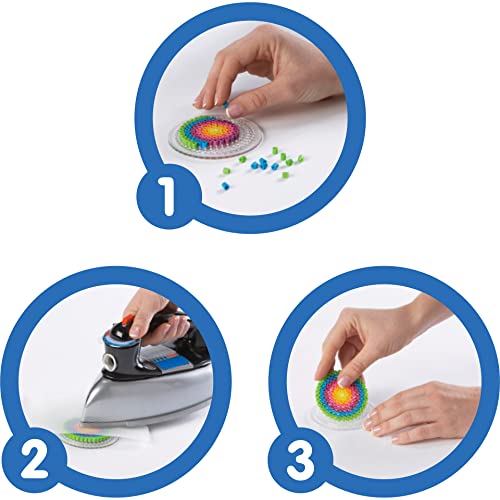
By far the most economical and fun project I’ve come across. Compared to other brands as well as individual bags, the 22000 assorted jar is the cheapest option for the best price, at $0.0015 per bead compared to the average 1000 single Color bag at $0.007 per bead based on current prices of $34.00 for 22000 jar and $7.00 for single bag of white beads - both by Perler. Also more economical than the Artkal 22000 jar that comes to $0.0029 per bead. I was able to sit down for a weekend in my spare time and sort about half of the assorted 22000 beads. It is tedious, but if you enjoy handy crafts you will likely enjoy sorting them, and it is well worth the wait when you finally get results. When factoring in sorting time, it is debatable if time will cost you money, if looking to sell your craft items, as the time it takes to sort the beads definitely cuts into time used to make crafts. Sorting beads is a long process, but I found what worked best for myself was putting one Color into a container of some sort (I used the smallest measuring tool I could find) and then dumping the beads into the storage container. This way I wasn’t wasting time picking up single beads and going back and forth or having to pool them into the palm of my hand which became painful over time just from the position of my hand. As my first project, I tested making the iconic PokeBall in a variety of styles. Using the mini Perler tweezers came in very handy even using with the 5mm beads. The peg boards were bought separately - I suggest looking for good deals as many come in packs of 2-4 for $15. You start by using your tweezers and picking up and placing beads one by one onto the board to create your design. It is fairly fast once you get used to the motions, and I rarely had issues picking up the beads. Sometimes for those stubborn ones I just used my hands or I had to fidget for awhile before it got into place - not a dealbreaker at all, just apart of the craft. When I finished my design I used the masking tape method (I’ve read not to use Scotch tape as it will melt and make a mess) to transfer my beads. You take pieces of masking tape and slightly overlap them until your piece is entirely covered. Make sure to make the pieces of tape slightly larger than your design and stick the edges of the first piece of tape to the board, as this will prevent the tape from curling up and taking your beads off of the pegboard prematurely (I was unaware of this so the first time I tried the tape method I had to place my beads down again on the board to realign them). Optionally you can pierce holes through the tape to help the air escape when ironing (I did not do this for my first project but I will next time and see if it makes a difference). Be sure to press the tape firmly on the beads - especially on the outer layer - as you don’t want your beads to unstick from the tape yet. Once pressed you should be able to easily lift your project off of your pegboard. The tape method also helps prevent melting your board overtime as with the tape method you don’t have to iron over your board. Face the tape face down on a flat surface (preferably one that is heat safe) and get some parchment paper and put it over your design (for this project I just used the iron paper that came with the beads but the creases in it could potentially leave crease lines on your design so be wary). For my iron, I am using the Cricut Heat Press 2, with the settings at 275 degrees Fehrenheit and 20sec. If you use a standard iron, don’t use water. When ready, put your iron on the parchment paper and heat away. Always move your iron in circular motions or keep the design where the heat is concentrated most. Apply minimal pressure. I check my design after 20secs to see if the beads have melted / fused yet. If not, I go back for another 20secs but apply minimal to no no pressure. When visibly fused (beads will look slightly squished and flatter) check to see if there are any loose beads. If so, iron again. If no loose beads, take a heavy flat object like a textbook and immediately place over design and wait about 30secs to a minute to cool. When cooled enough, take the tape off by gently peeling it off. When done, iron the side the tape was on with minimal pressure. This is to ensure beads are fused together enough that they won’t fall apart. Overall, ironing will take practice, patience, attention and trial and error. See what setting you like best, what the end design you like, and so on. If you over iron, your design will look like a marshmallow. If you apply too much pressure, your design will not have an even width and it will look like the beads are a candle that has candle wax overflowing. Be sure to have fun with it, And I hope this helped! Also here are the colours so far that I’ve found in my jar: 1. Red 2. Hot coral 3. Blush 4. Pink 5. Crabapple 6. Plum 7. Lavender 8. Light green 9. Dark green 10. Parrot green 11. Turquoise 12. Toothpaste 13. Light blue 14. Cobalt 15. Dark blue 16. Kiwi lime 17. Yellow 18. Cheddar 19. Butterscotch 20. Sand 21. Tan 22. Light brown 23. Dark brown 24. Black 25. Grey 26. White 27. Clear 28. Neon green 29. Neon yellow 30. Neon orange 31. Neon pink 32. Purple
E**A
What better craft for a summer break than a giant jar of perler beads? This massive jar made so many fun creations and there’s still a lot left. There are a good variety of colors and I fear they’ll never run out. They work as expected - my 12yo figured out the right amount of time and pressure to make so many things with these. Good value compared to smaller kits. I don’t think it came with the molds to hold them while ironing but those are easy to find.
I**E
Es un producto maravilloso, variedad de colores y muy fácil de mantener guardado.
Trustpilot
Hace 2 semanas
Hace 2 meses