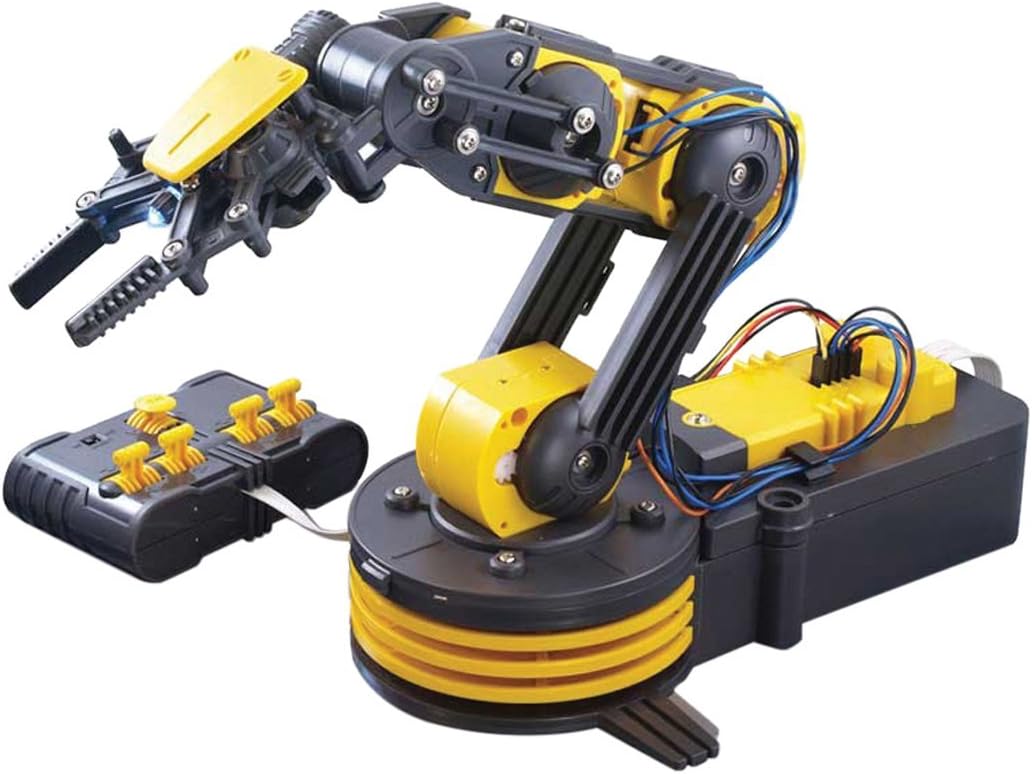

OWI Inc Robotic Arm Edge | No Soldering Required | Extensive Range of Motion on All Pivot Points
Product ID: 1048060
🔄270° base rotation
🦾300° elbow range
⚙️No soldering required
Buy anything from 5,000+ international stores. One checkout price. No surprise fees. Join 2M+ shoppers on Desertcart.
Desertcart purchases this item on your behalf and handles shipping, customs, and support to Uruguay.
🦾 Build, Command, Impress — Own the Future of Robotics Today!
The OWI Inc Robotic Arm Edge is a no-solder, battery-powered educational robotics kit featuring extensive pivot motion: 270° base rotation, 300° elbow range, and 120° wrist articulation. Designed for ages 13 and up, it offers hands-on STEM learning with easy assembly and interactive gripper control, making it a perfect blend of fun and professional-grade robotics insight.


| ASIN | B0017OFRCY |
| Age Range Description | Kid |
| Best Sellers Rank | #444,406 in Toys & Games ( See Top 100 in Toys & Games ) #570 in Remote- & App-Controlled Robots #4,931 in Kids' Electronics |
| Brand Name | OWI Inc |
| Color | Multi-colored |
| Customer Reviews | 4.0 out of 5 stars 1,389 Reviews |
| Educational Objective | stem |
| Global Trade Identification Number | 08007076200374 |
| Included Components | OWI OWI-535: Robotic Arm Edge |
| Is Assembly Required | Yes |
| Item Dimensions | 6.3 x 15 x 9 inches |
| Item Type Name | Educational robots |
| Item Weight | 1.07 Kilograms |
| Manufacturer | OWI Inc |
| Manufacturer Maximum Age (MONTHS) | 1200.00 |
| Manufacturer Minimum Age (MONTHS) | 156.00 |
| Manufacturer Part Number | OWI-535 |
| Manufacturer Warranty Description | Guaranteed against manufacturer defects |
| Material Type | Plastic |
| Model Number | OWI-535 |
| Number of Batteries | D batteries required. |
| Number of Players | 1 |
| Operation Mode | Automatic |
| Power Source | wired_electric |
| Set Name | OWI Robotic Arm Edge |
| Size | Medium |
| Sub Brand | OWI |
| Supported Battery Types | Robot D size 4 and Wireless Remote AA size 2 |
| Theme | video-games |
| UPC | 832313076874 766723279740 885759024541 885150029190 717356300226 763437231897 885912594171 092087695354 731395837536 885329734665 707283358193 609224804304 717356323164 717356249785 722532422043 717356341304 044968698855 013564036781 713331843283 885108452858 |
| Unit Count | 1.0 Count |
B**Y
Excellent Robotics Project
The robotic arm didn't take long to build. It is an excellent robotic's project. The instruction manual is very well put together and very easy to follow. I didn't have any hitches at all. The robotic arm worked perfectly at completion. If you build this project follow all the suggestions in the instructional manual. I also suggest obtaining the small wax bathroom cups to sort all the parts in before beginning to build. Otherwise you may end up like others have mentioned,having the wrong screws in some areas. I found that trick very helpful. Do get a fine tooth file and file off the left over plastic from parts. It helps it work smoother and makes it look better. I had no problem with the control box as some have had. It went together easily and works perfectly. Thinking and taking care while construction and wiring is the secret to success. I also purchased the USB Interface Kit for the robotic arm. The part that the controller fits into is replaced with one that has a power switch and a USB connection. That way the robotic arm can be operated and tested via computer. I also purchased the OWI-535 Curriculum containing exercises and experiments that are for individual use, in a school or in a home school. These also use the USB interface. I plan on using the curriculum with my grandson in our weekly robotics class on SKYPE. I highly recommend the robotic arm to any experienced kit builder to learn how industrial robots work. An inexperienced builder can assemble it but experience building electronic type kits definitely helps constructing it yourself or aiding a child in building it. It is recommended for 14 year olds and up but 11 to 12 year olds could build it if they are experienced builders and have handled a few tools. Again I highly recommend reading all of the introductory material in the manual and work slowly following all instructions carefully. I wanted to add that I demonstrated the Robotic Arm Edge for my 9 year old grandson tonight (Jan 5th) on SKYPE and he loved it and wants one. I will most likely get him one but will want to build it with him. The person that suggested pre-building the motor/gear boxes and then assembling sounds good but he would miss out on seeing the motors and gears.
R**N
Awesome!!
This thing is awesome! And, for less than $40, it's a steal. I'm 37, and it makes me feel like a kid. I bought it for my office to have as a fun conversation piece and stress-reliever. I built it in under 3 hours. Lots of little pieces and tricky things to pay attention to, but it was actually a lot of fun to build. The instructions are very good and easy to follow. I've assembled IKEA furniture that was harder than this, so its not that bad. Do yourself a favor and buy some D batteries from Amazon at the same time you order your robot arm. You'll want them handy when you finish building it so you can start playing with it immediately. It only runs on batteries. No AC adapter. You'll also need a mini-philips screwdriver. I used the Stanley 66-052 6-Piece Precision Screwdriver Set, also available on Amazon. You'll also need some basic needlenose pliers, and some nail-clippers to clips the plastic stubs off when you're breaking apart the plastic pieces. Think of old plastic model sets where you have to break out the pieces. It's like that. The instructions say to use an exacto knife and a file. I just twisted them and broke them by hand and used the nail-clippers to trim the stubs. Faster that way I think and good enough. You have to be careful. There is no auto-shutoff when you're using it. If you close the pincers for example and keep the motor going, you'll strip the gears. I made this mistake, had to disassemble a portion of it, re-seat the gears and then it was fine again. But, you have to be careful. If you hear the gears slipping (it'll sound like clicking) you need to ease off the controls and make sure your next move is in the other direction because you maxed out in one direction. Other than that very easy to use. It can only lift 100g per the specs, so it's not very powerful. You're not going to be moving furniture or anything with it, but I set up a little game to pick up wiffle golf balls and put them in a container. Easy enough task for people who come in my office and want to play with it. Highly recommend this!!
B**N
Excellent despite a few caveats
First, the experience of putting this together seems very daunting when you first take everything out of the box. However, the instructions are very clear, and finding the right piece is rarely more difficult than finding a lego brick. There are some parts that were more challenging, One being that there are 19 self-tapping screws that are meant to be screwed into plastic. These were too hard for my 9-year-old to handle. As this kit was designed for 13+ it wasn't surprising to find parts he had a little trouble with. The directions suggest that you use diagonal cutters, we had some suitable for electrical work and these were a little too broad for the task and we had better luck shaving off the excess from the molds with a knife. If you had the diagonal cutters for model making those would be perfect. Also, the battery connections are made from stamped steel and you have to bend them to work. I bent one by hand and nearly snapped it and the second I bent with the tip of pliers and it was a more rounded bend that is stronger. Other than this the kit seems solid and well made. The parts are robust and the soldering was excellent. We did have one major problem, The controller circuit board seems to be defective so each joystick only operates in one direction. The back of the instructions outlines the warranty information, the warranty is only good for 30 days after purchase and is only valid if you fill out the warranty information within 10 days after purchase. I had purchased this for Christmas more than a month in advance and had not filled out the warranty information when I received it from Amazon. I am hopeful that my plea will fall on kind ears and they will help me. If they cannot The cost of a replacement board for the controller is $30 and for a little bit more I can get a whole other kit here. So I can always fall back on that and hope that I don't get two lemon controllers. I hope that others can see this and take the time to fill out the warranty information as soon as possible and avoid issues like mine.
B**N
Fun but delicate
Nice idea but needs a few changes to be a really good toy. Putting it together is a bit tricky. The screws are hard to turn and the plastic pieces are cheap. I used a larger screw driver to provide the torque. I accidently stripped a screw - had to go to extraordinary measures to finish that gear box. It took 3 hours to assemble the toy. The biggest complaint is that it does not have stops at the end of travel for each range of motion. When it hits the end of its range, that gear box will start popping due to stripped gears. Very easy to destroy. My children became bored with it quickly but occasionally start to play with it again. I think it is good for firing up kid imaginations. My son uses it to snatch people from his sister's doll house, i.e. alien abduction. I would recommend the pre-assembled version. A slightly more sophisticated model with end stops for each range of motion and a PC interface would be worth the extra expense.
S**1
Fun robotics project
I was a little worry after reading all the reviews here, but decided to get one anyway. I purchased this robotic arms in hopes of learning more about how it's made and perhaps one day make my own with servos. You do have to assemble it, but it's not as hard as some people here claim. I'm not a patient person and it took me probably 2 hours, but I was going very slowly and taking greatest care of not to break any part. While it's all made out of plastic it doesn't really feel cheap. I found using small cutters best for detaching plastic parts. Just follow instructions in the book to the letter and you'll be fine! I did make a number of mistakes assembling it and nearly broke gripper. Gripper is the hardest part and manual doesn't mention that long screws are not suppose to be tight (they don't go all the way in) so I stripped two of them :( Another gotcha is size of some screws. They are extremely close in size to each other and I accidentally used wrong screws in couple of places but then realized and redid some parts. Forgot to install washers too, so had to remove and reattach base :) First thing I noticed right away is how small arm actually is. In the videos I've seen I thought it will be bigger, but it really is a toy size. Another small complaint is battery compartment. Once you close it, it will be hard to replace batteries later on. They should've made an opening at the end for batteries. Be aware that this arm doesn't have any sensors, so you can break it if you push it beyond it's range of motion. You'll be hearing a lot of nasty clicks but so far I didn't break it. Gripper is actually surprisingly strong and can lift things like a big screwdriver. Another thing I wish is for another degree of monition - gripper rotation. They way it's now you can only pick up objects that are perpendicular to the base. I would be fun to modify robotic arm with Arduino. Right now there are no real electronic components (other than motors and connectors), just straight connection from each motor to the buttons, which means it should be easy to mod. I've seen people adding encoders to the motors and pots so it can be made location aware and be programmed to perform specific tasks. Overall I'm very happy with this arm, you can't find better deal for the price.
H**A
Junk, but can be made to work.
This product is a huge disappointment. Unfortunately due to Covid restrictions I was not able to return it within the window so I am out the cost of this and my grandson is out a Christmas present. He assembled it as far as he could and then turned it over to me. He had the main portion assembled but had difficulty with the remote control. No surprise there based on what I found. 1. The screws that held the printed circuit board in place were extremely tight in their holes. As a general practice I do not like to force things so I was able to get four in place by applying the tip of a soldering iron to the head of the screw to heat them up. The fifth could not be inserted because the hole was not deep enough. I drilled it deeper (luckily had the correct size drill bit on hand) and again used the soldering iron trick to insert the screw. 2. Same size screws were to be used to hold the clamshell controller housing together but the holes were bigger and the threads had no grip. I had to run to the hardware store and purchase slightly bigger screws to fit. 3. Once assembled I was able to operate the arm. The first time the gripper is closed, it pops the cover off the LED that provides light. 4. After a couple minutes of operation the control paddles began to operate more than one motor at a time. I will look at this again tomorrow and see if that can be corrected. It turned out that the sharp edges on the switch had cut through the insulation on the PCB to which they are mounted. I was able to circumvent that problem by applying electrical tape 5. Some of the motions are quiet and others make a loud grinding noise which leads me to wonder how long this item will continue to operate, if I can get it to operate correctly in the first place. Overall this kit can be made to work but requires modification to do so. This includes * Drilling a hole in the control clamshell to the necessary depth (PCB mount.) * Purchasing screws to fit the holes used to hold the control clamshell together. * Properly insulating the PCB from the control switch "butterflies" to prevent cross connecting control inputs.
S**H
Robotic Arm Works Fine - OWI Customer Support helped ID and solve motion error quickly!
This is a great project; my son is 12, and was able to follow the very clear pictorial directions and assemble the robot in a couple of hours. We found - as others have reported in earlier reviews - that each of the robot's motors would only work in one direction, and spent another hour or so dis-assembling and reassembling the arm to identify the problem. When nothing we did worked, I called OWI's customer support, and they quickly shared that the problem was well known, and resulted from the batteries not all making good contact. They pointed me to their problem troubleshooting page (http://www.owirobot.com/pages/Robotic-Arm-Edge-Troubleshoot.html) which had numerous suggestions, and within minutes, we fixed the problem. The arm works as advertised, was fun to make, and seems well worth the cost. I recognize as a father that we want a present we purchase to work perfectly for our children, so that they aren't disappointed. But I have to say the fact that the robot arm didn't work at first isn't really as bad as it might seem, and finding a solution was a great learning experience, too. Lots of technologically complex toys and machines can have problems; we need when possible to turn that initial frustration and disappointment into curiosity and determination to find a solution. We'll try the programming kit soon, and I'll update the review with our results for that step.
T**G
"The Best Christmas Present Yet!"
The Robotic Arm Edge was one of our 10 year old son's top five Christmas requests. In the end it proved to be a great pick. He spent approximately 4 hours from start to finish to complete the project, with some guidance along the way from Dad. Once it was finished however, it did not work and he was discouraged. By then it was late and we were all tired, so we put it aside for evening. The next evening we went back to the troubleshooting page and read over the reviews here at Amazon to give us some clues about what the trouble might be. We also tested the wires and motors independently, one at a time, using a 9-volt battery and two wires to create a circuit with each motor. We knew that all of the connections were good because the motors and gears worked properly when powered by the nine volt battery. We then checked the battery terminals. We discovered they were not bent and positioned down properly. Once the terminal placements were corrected, we were able to get some partial movement with the control box levers, but only in one direction. We removed the top of the control box and 'warmed up' the metal plates by pressing each of them down manually in each direction with our fingers, to ensure they were making contact with the circuit board, and the robotic arm's mobility greatly improved. (You may have to repeat this step occasionally to maintain full mobility, double check wire connections, and make sure that the wires are not being crimped, tangled or pulled out of position by the movement of the arm. The wire clips are very helpful when placed correctly for this reason). The movement specs* from the manual are as follows: Gripper: 0-1.77" Wrist motion: 120 degrees Elbow motion: 300 deg. Base motion: 180 deg. Base rotation: 270 deg. Search light: on when on switch is on. *We found these measurements to be pretty accurate. Finally, we smoothed off a few plastic 'burrs' that were catching as the robotic arm spun on it's base, untangled and repositioned a few wires to keep them from tugging and pulling out of their connectors as the arm revolved, screwed the control box back together, and Oila! The robotic arm now works beautifully, LED light and all. Our son declared, "I am Satisfied!" with a huge grin and a sigh of relief :) It was great outcome to a slightly challenging project. The gearboxes were a bit taxing to put together from a 10 year old's perspective, but he stuck with it, even though it was a initially frustrating. After putting together several of the gearboxes he was a pro. We encouraged him to take his time and read the instructions thoroughly to become familiar with the concept and sequence of steps before he began, and we think that really helped to make the project go much smoother for him than it might have otherwise. One precaution: If you hear clicking noises as you move the robotic arm with the controls, that means to stop and go back in the other direction! We have explained that it is important NOT to try to manually force the arm to move in one direction or another, or the gears may break! You may also be trying to lift too much, depending on where the center of gravity is in relation to the weight of the object. Because of the plastic gears and other components, it is a TOY more than it is a tool. Our son is looking forward to using the 'RAE' to assist him in other building kits, such as legos, kinex, and maybe another similar robotic project. The best lesson that came out of this for us was that putting our heads together and combining our knowledge, skills with a little perseverence kept us from giving up on it and assuming there was something defective about the kit. We worked backward and retraced our steps, and it was a great success. What could be better than learning and having lots of fun in the process? :) I am writing this review because we were helped greatly by the informative reviews already posted here, and I hope that what we learned along the way can help someone else, incase they get stuck a bit as we did. It's worth it to press on and find solutions to problems, and our son is enjoying the fruits of his labor and is all smiles now :) The stars were his review of this product.
C**N
Vale la pena el producto
Llego rápido el roducto y en condiciones excelentes, contenido completo ninguna pieza faltó y el manual es excelente explica bien aunque está en inglés pero es lo de menos y muy padre poder armarlo
A**R
super good
little hard but very nice working. Right now I am typing with my robotic Arm
O**N
Robot arm for under 60 CAD, wicked deal.
This kit is pretty awesome for the price. All parts are plastic with metal screws but was a great intro to robotics for my son, even though I wound up putting most of it together. The max load on the arm is 100g, which is expected considering all the gears are plastic. You can also wire this up to a Arduino/Motor Driver yourself without butchering the wiring, so the potential for programming is there as well. Instructions were also very clear, except for the screw labelling. They seemed to come in random bags with no real order or labels, which is a pain because there's parts that use the same size/length screws only with different threads on them. I think that's were a few of the other reviewers ran into problems with 'stripping' the screw hole. The hole isn't stripped but you'll get that feeling if you use the fine threaded screws in the coarse thread holes for example. All in all quite satisfied, good product!
O**O
buen producto
buen producto
K**H
Product is Awesome. Suitable to do programing as well
Product is Awesome.Suitable to do programing as well.Installation will take some time.
Trustpilot
2 months ago
3 weeks ago