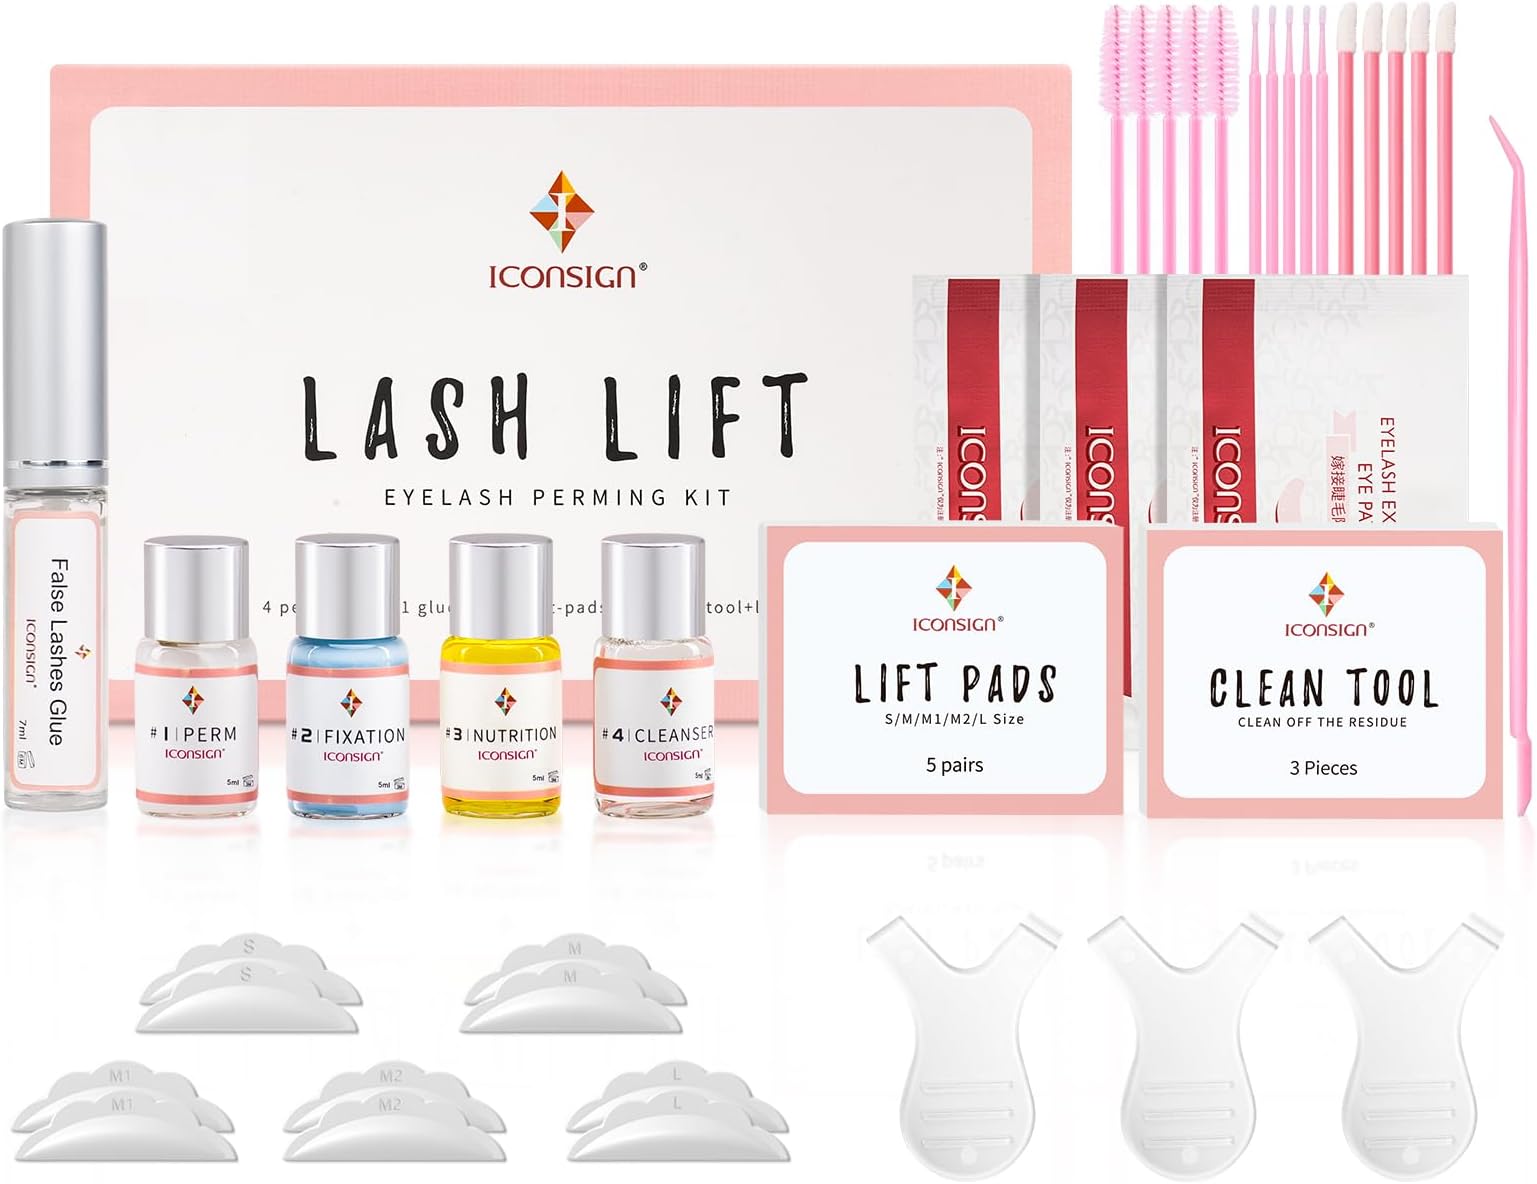

Buy anything from 5,000+ international stores. One checkout price. No surprise fees. Join 2M+ shoppers on Desertcart.
Desertcart purchases this item on your behalf and handles shipping, customs, and support to Uruguay.
✨ Elevate your lash game—curl, lift, and conquer with ICONSIGN! 💁♀️
The ICONSIGN Lash Lifting Kit is a professional-grade, semi-permanent eyelash perming set designed for both beginners and pros. Featuring an easy-to-use milky white glue and enough product for 10-13 applications, it delivers natural, voluminous curls lasting up to 3 months. Perfect for salon-quality results at home or special occasions, this alcohol-free kit offers exceptional value and effortless beauty enhancement.


| ASIN | B07NZ38MXK |
| ASIN | B07NZ38MXK |
| Benefits | Effortlessly achieve stunning, voluminous lashes with impressive longevity and perfect for special occasions. |
| Best Sellers Rank | 3,654 in Beauty ( See Top 100 in Beauty ) 5 in Lash Curlers |
| Brand Name | ICONSIGN |
| Colour | Regular |
| Country Of Origin | China |
| Country of origin | China |
| Customer Reviews | 4.0 4.0 out of 5 stars (16,080) |
| Customer reviews | 4.0 4.0 out of 5 stars (16,080) |
| Finish Type | Natural |
| Included Components | Perming Agent |
| Item Dimensions | 18.2 x 11.8 x 2.2 centimetres |
| Item Form | Ready Mix |
| Item Weight | 0.15 Kilograms |
| Item model number | IKA-001H |
| Manufacturer | ICONSIGN |
| Manufacturer | ICONSIGN |
| Material Type Free | Alcohol-Free |
| Number of Items | 1 |
| Product Dimensions | 18.2 x 11.8 x 2.2 cm; 150 g |
| Skin Tone | All |
| Skin Type | All |
| UPC | 740646336971 788482087299 |
| Unit Count | 1.0 count |
H**H
Fantastic kit
Exceeded my expectations! Results just as good as the salon. Process is easy enough to follow too. Such good value compared to salon prices considering you can get several lifts out of one kit. Hopefully it will last just as long. Would definitely recommend!
K**T
Fantastic product. Works perfectly
Absolutely chuffed with the product. Gave my lashes the serious lift they needed. My natural lashes are quite short and very straight. Not anymore 😁
C**Y
Great kit and straightforward to use.
Great little kit. I've never done them before. Did patch tests (please do this - I work in A&E and see lots of people who fall foul of cutting that corner) Found a lass on YouTube who gave some great tips and full instructions. Got loads left and at a fraction of the cost. Judge for yourself!
I**A
The upgraded version is not great
The upgraded version is horrible. I purchased this a few years ago and the kit was great, the perm and fix solution was great and my lashes would look great afterwards and healthy. After purchasing the new kit and having done the process as I usually do, and using the exact size I normally use, this kit has left my eye lashes over curled and fried! They look shrivelled up and super u healthy. Not at all natural looking but instead my eyelashes now look damaged. Really disappointed.
F**K
LVL Kit
I found the LVL kit to be easy to use / well packaged / straightforward The instructions were clear and the results were satisfying. One thing I would advise is not to leave the product on too long or use the smallest pad as my eyelashes are mega curly from the end lol my own fault. Also if your lashes don’t stick to the pad once the product is on I would recommend to use cling film. Overall, I would recommend it rather than paying £30 every month.
J**J
all factors together… not worth it.
ive tried a couple times now and its certainly good at what it does if YOU are good at executing it. i like to dye my lashes aswell to make them darker but dye doesn’t come with it, getting that separately is another £7-10. the only money i think you’re saving doing this yourself rather than going to a salon, is the transport there. you only get one use put of this kit. as much as it looks like you could get a few, as soon as the perm solution seal is broken, within a week it goes yellow and off, and it wont work again. Soooo, 20 odd quid for a fiddly single use, trying to do everything with one eye closed the whole time, when i could just get someone else to do it… not entirely worth it the money or time spent for me. sorry🤷🏼♀️
A**R
Brilliant value for money and great quality
Brilliant value for money. Watched an 8 minute video online, made sure I left on for the max time stated and bobs your uncle! I wear mascara quite regularly and it does weigh my lashes a bit but before the lift the outer corner lashes drooped and then with the mascara it weighed them down even more. I used M1. M2 or L wouldn't likely give the nice curl you'd want from a lash lift but I may try M next time also. I even managed to create a cat eye effect via watching a video also. Has multiple uses- I genuinely think more than 4 uses which it states, so fab value for money. I'm also super super sensitive and this didn't cause any reaction. I did patch test all of the parts of this 24h in advance on the inside of my elbow and no issues. 2 weeks later it's holding up well, albeit not as perfect as the first week, but then I do use a lot of product. As some people said, new lashes won't be curled, and I use lash serum so the new growth being less curly does make the lashes look less lifted, but that's because the new growth hasn't been lifted/permed, so completely normal and natural. My lashes have also been a good quality since perming, no additional falling or breakage. I'll probably do another lift in a few weeks, so maybe around 4-6 weeks after the first lift for nice maintenance. All around really happy. Oh and let the glue get a little tacky before applying the M1 sizer to the lid, and hold down nice and firm for a nice fit as close to the lash line as possible. Also one eye at a time. Great product
A**R
Amazing, better than the salon results!
I brought this after reading the reviews and I watched the video tutorial on YouTube. The trick with the glue is to let it air dry for about 20 to 30 seconds before you stick it to your eyelid and it will be super sticky. I have very thick long eyelashes and went for medium number two and the results were amazing. I think next time I may try medium number one or medium to give me more of a curl. In the video she does say if you opt for a smaller one, don't put the perm solution on the tips until the very end to stop them curling back on themselves. I will never go to a shop again to get these done and have saved myself a fortune such a good value for money. I also applied a separate tinting kit to them after and they look amazing.
A**O
Quedé encantada con este kit de lifting de pestañas. Trae todos los productos necesarios, bien organizados y con instrucciones claras, lo que hace que el proceso sea fácil incluso para quienes no somos profesionales. El resultado fue impresionante: las pestañas quedaron levantadas, curvadas y con un aspecto muy natural que dura varios días. No me causó irritación ni molestias, y el adhesivo funcionó muy bien para fijar las pestañas en los moldes. La relación calidad-precio me parece bastante bien. Ya lo he comprado varias veces y volvería a repetir la compra!!
D**!
Super product, als het volgens de instructies gebruikt wordt komt het resultaat heel mooi uit. Ik had een YouTube tutorial erbij gehouden en heb prachtig resultaat Gekregen
V**E
Devo ammettere di aver acquistato questo prodotto dopo averne visionati parecchi, recensioni incluse, e di averlo fatto con un certo scetticismo. Premetto che le mie ciglia erano totalmente piatte e sembravano anche molto corte. In qualche occasione avevo provato a tingerle, ma con nessun risultato effettivo. L'unica cosa che aiutava era l'eyeliner permanente fatto qualche anno fa, ma comunque le ciglia rimanevano praticamente invisibili. Oggi ho provato ad usare questo prodotto, seguendo un tutorial su Internet, e devo dire che l'effetto mi ha sorpresa. Non ho sicuramente una grande manualità nè esperienza in questo genere di cose ma, armatami di contenuto del kit acquistato + specchio posizionato in maniera ravvicinata, dischetti struccanti, cotton fioc e pellicola già tagliata in 4 pezzetti per coprire gli occhi prima durante la permanente e poi durante il fissaggio, sono riuscita senza troppe difficoltà a fare tutto. Allego la foto del risultato, che a me sembra incredibile data la base di partenza. Bisogna avere tempo a disposizione per seguire tutte le fasi per bene e senza fretta, e avere tutto a portata di mano (compreso il portatile/cellulare per seguire il tutorial passo dopo passo). Soprattutto è importante la fase dell'incollaggio del pad alla palpebra: piegate il pad con le dita per accentuarne la forma arrotondata, prima di attaccarlo, e poi mettete tanta colla nella parte inferiore, soprattutto agli angoli del pad (quelli tendono a staccarsi dalla pelle); niente colla invece sotto la linguetta superiore, che vi servirà alla fine per prendere il pad con le dita e staccarlo. Premete il pad sulla palpebra finchè non risulta ben attaccato e poi passate tanta colla sopra alla parte arrotondatra del pad per appiccicarci le ciglia. Aiutatevi con lo stick del kit, o anche con un cotton fioc. Prima di passare a permanente e fissaggio, verificate (anche guardandovi di sbieco allo specchio) che tutte le ciglia siano ben attaccate al pad (io ci ho ripassato sù più volte un cotton fioc facendocelo rotolare sopra e schiacchiando). Poi passate al resto. Io sono riuscita a fare tutti e 2 gli occhi insieme perchè, nonostante gli occhi fossero un po' "appesantiti" dal pad, riuscivo a vedere bene. L'importante è non spingere i prodotti all'interno dell'occhio, altrimenti vi bruceranno. Nei prossimi giorni ho intenzione di nutrire molto le ciglia con olio di ricino, poi verificherò la tenuta del risultato nel tempo, ma per ora sono pienamente soddisfatta. Ho aggiunto una foto scattata 8 giorni dopo il trattamento. Le ciglia sono un po' scese, ma vanno ancora bene, si sono staccate tra di loro e l'effetto, anche se meno forte, mi sembra più naturale. Resto soddisfatta.
P**H
Super tolles Produkt! Ich habe zwei Fotos beigefügt - auf dem ersten sieht man mein rechtes Auge nach dem Lifting und das linke davor, und auf dem zweiten den fertigen Effekt an beiden Augen. Ich bin wirklich zufrieden! Die Anwendung ist einfach und das Ergebnis wunderschön natürlich. Ein paar kleine Tipps von mir: -Wenn du den Kleber auf das Silikonpad aufträgst, warte einen Moment, bevor du die Wimpern darauf drückst. Sobald der Kleber etwas angetrocknet ist, haften die Wimpern viel besser. Wenn er noch zu flüssig ist, rutschen sie eher weg. -Lege nach dem Auftragen der ersten und auch der zweiten Lotion etwas Frischhaltefolie über die Wimpern - das intensiviert den Effekt. -Du kannst die Einwirkzeit ruhig ein wenig verlängern. Bei mir waren es jeweils 10 Minuten und das Ergebnis ist perfekt geworden. Ich kann es auf jeden Fall weiterempfehlen!
M**M
La notice explicative est mal faite, on va toutes se referrer à un tuto sur YouTube Première fois pour moi, je l'ai fait solo, et les deux yeux quasi en même temps pour gagner du temps... En moins d'1h c'était réglé... Sauf que j'ai eu deux techniques et donc 2 résultats différents: Première photo: cils totalement recourbés, effet faux cils volumineux (œil droit) Deuxième photo: cils décollés, parfait pour le mascara (œil gauche) Technique première photo: - J'ai choisis les plus petits coussinets pour mes yeux - un petit coup de toner pour nettoyer l'œil et les cils 1. Il faut mettre la COLLE sur la face qui va s'appliquer à votre paupière, hésitez pas à en mettre parce que ça collera quand même pas du premier coup :) Et c'est LA partie la plus tricky pour moi, ça s'accroche pas, j'dois remettre un peu plus de colle, puis je repose sur la paupière Les bords du coin se détachent, tant pis j'attaque la suite =>elle est là l'astuce, vous allez galèrez à recourber sans cesse ces cils qui ne veulent pas coller, et en fait c'est pas plus mal, car les deux côtés du cil vont recevoir les soins Je rajoute la colle sur le dessus du coussinet et sur les cils que je relève sur le coussinet progressivement avec un mini peigne pour cils (bien meilleur !)- une brosse à dent fera l'affaire, poils doux hein 2. La permanente (ou le lissage si vous préférez) L'odeur me fait penser aux produits defrisant et pour les permanentes... Il va rendre le poil malléable :) Temps d'attente: j'ai laissé 20min (je conseillerai 5min pour cils courts, 10min pour cils fins et 20min pour cils plus épais) Sauf que le coussinet s'est légèrement détaché, et je dois sans cesse rehausser ces cils qui retombent =>elle est là l'ASTUCE !!!!!! Rehausser sans cesse va leur donner cet effet recourbé, pour qu'ils puissent à chaque fois recoller qques sec sur le coussinet... Plus tu rehausses, plus le résultat effet volume et recourbé est garanti 3. Le fixateur de permanente Une fois que la permanente est suffisamment imprégnée, passez à l'étape de fixation... Même souci que pour l'étape précédente, j'ai pas arrêté de rehausser pour faire coller les cils au coussinet Temps d'attente: 20min -> va probablement prolonger la durée de la permanente... Je conseillerai max 30min quand même 4. Huile 5. Cleanser L'étape 4 et 5 consistent selon moi à un double cleansing façon skincare pour les cils - tu nettoies les résidus de produits et de colle sur les cils avec L'HUILE (+hydratation et protection), attention de ne pas absorber trop d'huile sur le coton tige, ça peut rentrer dans les yeux - le 2e NETTOYANT LIQUIDE va retirer le reste de résidus de colle sur le coussinet et ensuite vous aide à le décoller de votre paupière Ps: j'ai fini 3h plus tard par nettoyer mes deux yeux avec un oil cleanser, parce que les résidus de colle ça pique 2e photo: explication plus courte :) 1. COLLE: j'ai laissé sécher la colle 30sec avant de l'appliquer sur la paupière. Elle s'est décollée alors j'en ai remis vraiment beaucoup plus, surtout sur les coins Puis j'ai mis en appuyant sur ma paupière pendant au moins 2/3min... (je sais plus je faisais l'autre œil entre-temps) Ensuite colle sur le dessus du coussinet, à la base des cils et sur les cils, et j'ai rehaussé jusque ce que la colle a séchée (30sec en continu max, jusqu'à sentir la résistance du poil qui veut plus bouger en brossant vers le haut) .2. Permanente Temps de pause 15min 3. Fixateur de permanente Temps de pause 10min 4.huile et 5. Cleanser Cette technique est moins stressante vu que tous les cils sont bien collés, mais pas d'effet recourbé, juste une meilleure longueur Alors team 1 ou team 2... A vous de voir Et si mon commentaire vous aura été utile, fais le moi savoir
Trustpilot
2 weeks ago
1 month ago