


Buy anything from 5,000+ international stores. One checkout price. No surprise fees. Join 2M+ shoppers on Desertcart.
Desertcart purchases this item on your behalf and handles shipping, customs, and support to Uruguay.
🚀 Keep your data cool and your workflow hotter!
The SABRENT Docking Station is a sleek, lay-flat external hub designed for 2.5" and 3.5" SATA HDDs and SSDs up to 22TB. Featuring USB 3.0 connectivity, it delivers transfer speeds up to 5 Gbps, while its built-in cooling fan ensures optimal drive temperature and longevity. Hot-swappable and driver-free, it offers seamless plug-and-play compatibility with Windows and Mac systems, making it an essential tool for professionals managing large data sets or backups.


| ASIN | B013WODZH0 |
| Best Sellers Rank | #21 in Enclosures |
| Brand | SABRENT |
| Built-In Media | Sabrent USB 3.0 to SATA External Hard Drive |
| Color | Black |
| Compatible Devices | Desktop, Laptop |
| Customer Reviews | 4.3 out of 5 stars 8,581 Reviews |
| Data Transfer Rate | 5 Gigabits Per Second |
| Global Trade Identification Number | 00819921011831 |
| Hard Disk Form Factor | 2.5 Inches |
| Hardware Interface | USB 3.0 Type A |
| Hardware Platform | Windows |
| Item Dimensions L x W x H | 7.24"L x 4.88"W x 1.89"H |
| Item Weight | 9 Ounces |
| Manufacturer | SABRENT |
| Memory Storage Capacity | 6 TB |
| Mfr Part Number | EC-DFFN |
| Model Number | EC-DFFN |
| Product Dimensions | 7.24"L x 4.88"W x 1.89"H |
| Supported Devices Quantity | 1 |
| UPC | 819921011831 |
| Warranty Description | 1 Year limited |
R**2
Sabrent: A Good Docking Station That Can Be Improved With Some Easy Changes
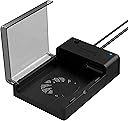
What's Good About the Sabrent EC-DFFN External Docking Station 1. The case is lightweight and well made. 2. It works well. I was able to transfer about 500gb of data per hour. 3. It's quiet and attractive. 4. It utilizes USB 3.0 which is about 10 times faster than 2.0. 5. The included cables are just the right length. What's Can Be Improved 1. The price. I paid $32 for mine. 2. The screens meant to protect your fingers impede the fan's air flow. 3. The rubber feet need to be taller to improve the fan's air flow. The current design creates a lot of back pressure that prevents the fan from operating at its full capacity. The Sabrent EC-DFFN external USB 3.0 docking station is well made. However, it can be improved. Read on if you would like to learn how to modify the case and improve its air flow. That's important if you are going to be running your external hard drives for long periods of time like I do. ********************************************* ONE WORD OF CAUTION: Take your time, you don't want to damage your docking station's case. Tools You'll Need A small Phillips head screwdriver, an Exacto knife and a thin knife or a razor blade. All three will work. This modification takes about 15 minutes to complete. Parts You'll Need 1. Four — 6 x 3/4" Flat Head Screws (Phillips Head) Note: 6 is the diameter of the screw. (These are used to mount the rubber feet.) 2. Four — 6 x 1/2" Pan Head Screws (Phillips Head). (These are used to mount the grill to the fan.) 3. Two — 80mm Computer Fan Grills (sometimes listed as 8cm grills). 4. Four new rubber feet approximately 1/2" by 1/2" inch is ideal. However, the ones pictured in the photos are 1/2" tall by 3/4" wide (tapered, cone-style feet). I already had those, so that's why I used them. How to Improve the Air Flow on the Sabrent Docking Station (Be sure and refer to the pictures for additional help.) 1. First, make sure it's unplugged before you do this modification. 2. Remove the rubber feet on the bottom of the case. They are glued in place. 3. Remove the screws that you find underneath the rubber feet. 4. Remove the screws holding the fan in place and remove the outer screen. 5. Use an Exacto knife or a thin knife blade to pry open the bottom of the case. 6. With the bottom off, wiggle the fan loose from its four anchor posts. 7. Remove the inner fan screen. 8. Slide the fan back onto the posts and press into place. 10. Reattach the bottom of the case. 11. Mount the grill onto the fan by screwing it in place with the Pan Head screws. (Indented side of the grill needs to face outward from the case.) 12. Attach the four rubber feet to the corners of case with the Flat Head screws. (You have now completed the modification.) In my opinion, the docking station doesn't need a grill to protect the inward facing side of the fan because the lid and the drive you insert already do that — just be sure and turn off the power before opening the lid. The fan stops spinning in about three seconds, and only runs when there is a standard hard drive installed. It does not run if you insert an SSD drive because they don't get very hot and don't need the extra cooling. The docking station automatically senses if the drive you have inserted is an SSD or standard (spinning disc) hard drive. Note: If you decide you want to install an inner fan grill you can. Just remember it will make the grill on the bottom bulge out another quarter of an inch. If you do install an inner fan grill, be sure and insert it with the indented portion of the grill pointing towards the inside of the case. Things You Need To Know Before You Connect And Use The Sabrent Docking Station 1. Insert your hard drive and connect all the cables to the case and your PC before you power it on. 2. Turn off the power to the case before you disconnect the hard drive or cables. Note: Once you have powered down the docking station, you do not need to turn your computer off to disconnect it. Think of the docking station as a flash drive you have to power on to use and power off to disconnect. Some Useful Hints You Need To Read Before You Begin This Modification 1. Don' t be in a hurry. 2. Be careful when you pry open the bottom of the case. If you slip with the knife, you'll scratch it. 3. It will be easier to remove the bottom of the case if you use a small, stiff wire that you have formed into a "J-style" hook and slide it into one of the holes left by the removal of screws. Pull up on it as you pry open the base. (A paper clip works great.) IMPORTANT — PLEASE READ: Before you put everything back together, take the appropriate screws (Flat Head or Pan) and semi-install them into the holes in the posts that hold the fan and the rubber feet in place. SCREW THEM IN ONLY HALF WAY to avoid stripping out the plastic threads and then remove them. Doing that, presets the screw hole and makes it easier for you to reinsert them when you do the final installation of the rubber feet and fan grill. However, be careful not to over-tighten them. To work properly, they only need to be tightened to the point that they are snug. One final note, when not in use, turn off your Sabrent Docking Station. It will help extend the life of your hard drives. It's just a guess, but I believe this modification almost triples the air flow — keeping your hard drive nice and cool. That's important if you have tons of data to transfer, as hard drives can get very hot if not properly cooled. By the way, the largest drive I have used in these docking stations is a 10 terabyte drive. So far, they have worked flawlessly.
D**S
Great Storage Docking Station
So i have had this product since March of 2018 and even decided to buy a second unit since i have multiple internal storage drives which i have laying around. This docking station unit gives me the ability to connect any SATA internal drive i have whether its a small 2.5in drive or 3.5in into it. supports up to 6Tb of storage and is really easy to install and connect to my computer for easy access. Because of the side door bay that opens up i can easily slide in and out the hard drives i wish to connect and change with ease whenever i need to see whats on my other drives or transfer data from one another. This unit has a small fan which cools down the hard drive when its running at full speed and will continue to run until you turn off the docking station. Their really isn't much to say about this other then a really great product to have and carry around whenever you need to transfer files from drive to computer or back. The quality control is pretty well made for the price being offered. I'm sure their are far better options out there but they aren't cheap either and some aren't even portable. The max write/transfer speed i have achieved for this product was 150-250MBps which isn't fast but its fast enough to move multiple large files back and forth, it is a usb 3.0 so its capable of reaching higher transfer speed however that will be the limitation of the drive you insert into the docking station and where the usb is being plugged into. Since using it, and i mean using it a lot, i haven't encountered any issues at all, when plugging the unit into my computer it connect in just a few seconds and picks up the drive rather quickly, so far this product has been working flawlessly for me sometimes ill end up leaving it running for long periods of times and it will still function great. I have nothing but great compliments for this product.
B**N
Reliable and simple
Easy setup works great as an external Hard drive or as a method of Maintaining Extra Hard drives or solid state. Excellent Product
L**.
Good product for the price.
I am very satisfied with this Converter. It immediately worked upon connection with no problems and no trouble-shooting necessary. The cables are a little awkward connecting to the drive because of the lengths of the cables. I found that if you connect the power between the converter and the drive first, it's a little easier to connect the data cable to the drive. One word of caution... The USB connector to the PC is very weak and bent very easily. I don't know if it will eventually break, but I was able to get data off all eight of my old hard drives, so other than the cost, I'm not overly concerned - I just suggest if you buy this, you be careful. Overall, a good product that worked as I needed. I would have rated five stars if it wasn't for the connection to the pc.
A**R
AVOID!!!
BUYER BEWARE: if you plug-in a disk, and your partitions/data won't show up, don't immediately assume is an issue with the disk; it's most likely the sabrent enclosure. This is my 3th sabrent unit and there's always some issue: - The 1st (USB-DSC5), was mildly useful, until the size of the disks and USB compatibility issues got in the way. I also vaguely remember plugging some disks and partitions were not recognized, but always assumed it was disks issues and didn't think about it twice. - The 2nd (EC-DFFN), useful if you plan to use it with the same disk and hope nothing ever goes bad. Still, had multiple USB issues and disconnections out of the blue while writting to the disk, which prompted me to fear for data lost. Defeats the whole purpose of having it in the first place, if you can't trust the device supposed to be the solution... - The 3rd (EC-HD2B), I bought it because the 2nd enclosure was acting up and made me wonder if I had lost the data, just to find out this new enclosure wouldn't read the disk at all, because of the sector sizes (EC-DFFN) gave to the disk. After a lot of tinkering around and days spent almost having to become an expert in the field, I realized the issues all came from these sabrent enclosures. It's a significant issue with these units. If you plan to use disks that've been initialized/formatted/partitioned in other enclosures, or alternate disks between enclosures and desktops, avoid this brand. The partitions and data might not show up, which is alarming to a user. It makes you assume the data has been lost. When in fact is just an issue with the enclosures and the way they read the disk's sectors size. Considering this product is to assist with backups and provide a way to plug and play multiple disks, this issue is a massive deal breaker. Once you partition a disk with an enclosure, they are basically dependent on each other. They should just sell an enclosure with an embedded disk because the ability to plug and play disks is so problematic to the point of being useless. When a device complicates the problem's supposed to solve, it has failed its purpose. /rant-over
M**E
Works
Inserted the drive, plugged it in, off and running, working as expected.
R**N
Easy to use
Very good product. Plug and play.
J**E
Plugs in, works perfectly, lightning fast on USB3
This is a brilliant idea. The HDD SATA drive I my old HP tower had most of my personal & media files. The tower rack had four small screws installed in the rails of the drive. You need to remove them. The SATA drive slides in smoothly & clicks securely in place. Either dismount or power off your PC before removing or swapping out the drive. The speed difference for USB3 versus USB3 is enormous. Check your USB ports to see which is truly set up for USB3. To see the configuration use something like a USB tree viewer. The Sabrent is solidly made with an excellent heavy cable. It plugged in & worked immediately. Nothing special to do. It appears as another drive in the drive list of the PC. I'm really pleased with this adapter.
F**O
Ottimo
Ottimo, lavora bene anche con i dischi IDE più vecchi. Un po’ contorto il passaggio dei cavi di alimentazione ma lo spazio disponibile non è molto
V**F
Works well and most of all it has a power switch on the device itself.
The built-in power switch saves me a lot of hassle of having to deal with the power adapter and the usb port.
V**N
Cumple con las espectativas
Muy sencillo de manejo. Recuperé toda la información de un HD de un ordenador inservible y lo convertí en un HD externo con conexión USB. Le cambié a mi portátil el HD por un SSD clonando primero el HD en el SSD y dejando el HD como externo con conexión USB. Todo perfecto y muy satisfercho con el producto.
M**.
Great product!
It’s easy to use and good value for money. I like that Sabrent provides firmware updates. Tip: Any capacity HDD (even 16 TB+) is now compatible after a simple firmware update if the firmware isn’t up to date. I suggest updating the firmware before simply claiming that the product doesn’t work and leaving negative feedback. The firmware update tool is on the downloads page on the Sabrent website. I booted Macrium Reflect 7 free to clone/image a laptops HDD to a larger capacity SSD and this EC-DFFN Dock did the job perfectly. I updated the firmware from 1.0.4 to 1.1.4 too. I haven’t used it with a 3.5” drive yet. I only had one problem after cloning the HDD to the SSD and although it wasn’t the docks fault, I’ll say it anyway as it may help others: I didn’t set MR to extend/expand the C: (Windows partition) so after cloning the HDD to the SSD there was a large amount of “unallocated space” at the end of the SSD with a partition between it and the C: but thankfully the “Extend Partition Wizard” in “AOMEI Partition Assistant” was able to fix it in seconds. If there’s no partition/s between them then it’s not really an issue as Windows can fix it and you won’t need an app like AOMEI to do it.
D**4
Buen producto.
Cumple lo que describe, fácil de usar. Solo conectas y queda listo.
Trustpilot
1 month ago
3 weeks ago