

Buy anything from 5,000+ international stores. One checkout price. No surprise fees. Join 2M+ shoppers on Desertcart.
Desertcart purchases this item on your behalf and handles shipping, customs, and support to Uruguay.
โ๏ธ Power your system with precision and reliability โ donโt get left behind!
The A.O. Smith ORM5458 condenser motor offers a robust 0.17 HP output at 1075 RPM, designed for 208-230V systems. Featuring durable copper construction and sleeve bearings, it supports reversible rotation with auto overload protection, making it ideal for HVAC, heat pumps, and refrigeration applications. Backed by the trusted Century brand legacy, this motor ensures dependable, energy-efficient operation in demanding environments.
| ASIN | B00512H3D4 |
| Amperage | 2 |
| Best Sellers Rank | #130,336 in Home & Kitchen ( See Top 100 in Home & Kitchen ) #1 in Air Conditioner Replacement Motors |
| Brand | Century |
| Brand Name | Century |
| Customer Reviews | 4.6 out of 5 stars 226 Reviews |
| Horsepower | 0.17 Horsepower |
| Item Weight | 5 Kilograms |
| Manufacturer | Century Electric/AO Smith Motors Co |
| Material | Copper |
| Material Type | Copper |
| Model | ORM5458 |
| Part Number | ORM5458 |
| Speed | 1075 RPM |
| UPC | 786674028273 |
| Unit Count | 1.0 Count |
| Voltage | 230 Volts |
S**S
Fitment and installation very easy
The motor worked perfectly with the ac unit, no issues, been working for over a month, no noise, good wiring, perfect fitment
R**T
Motor was easy install and works great
Easy install. Fit perfect except had cut about 2 inches off shaft. Wiring was easy . Seems to be a good quality motor This motor fits nearly all our AC units. I keep a spare on hand.
R**I
Works great and is flexible for multiple different installation needs.
We are going with love it (love at first install, anyway). The reason for the "love it" rating is two fold. First, it showed up as advertised and when expected. Second, the design allows for a lot of play in installing it. This can also be an issue with inexperienced do it yourselfers as the case/mounting bolts really need to be adjusted and cut or you can cause the fan to strike them. This goes for all the extra wires to make it universal as well. You need to take care that the wires are tied up and out of the way of the fan and in my case, make the portion of the case bolts shorter on top for the acorn/cap nuts on my really old Lennox, and cut off the excess on the "bottom" of the motor where the fan blade mounts. You could slide the fan further down the shaft, but that will (in my opinion) shorten the life of the bearings. The only issue that you will have is deciphering what your wiring is. I HIGHLY suggest two things. First take a picture of where your current wires are. Second, keep the old motor and make sure that you keep the wiring diagram usually printed on the side of the motor in tact when you are wrestling off the old fan (this can be a real pain in the ass and you can forget to be gentle when you are frustrated). You should probably snap a picture of the wiring diagram on the side of the motor as it may not be readable after you ceremoniously beat it to death with a sledge hammer after the fan blade removal ordeal! The pictures really help! I was a little confused by all of my wiring options and I was able to draw a correct conclusion by looking at the pictures and reading the diagrams on the new and the old motor (which I am now beating into a flat metal pancake with my short handled sledge hammer for satisfaction purposes)! Have fun and remember that you can pay a repair guy (in my case $235 for the motor and a service call of who knows what) or you can pay under $80 and do it yourself!
J**E
Easy Motor Replacement Overall for Condenser Unit. Recommend getting a HUB Puller for the existing fan blade removal.
Easy replacement install. Highly recommend picking up a Hub Puller too, before trying to do this replacement DIY. The fan blade is most likely locked onto the old shaft and even after removing the set screw, this is difficult to get moving and off. A hub puller is designed for this and they are under $30 on Amazon. I bought my on Prime as same day delivery on a Sunday when my fan went out and I had no other options. I live in Texas so it was near 100 degrees that day. I didn't know about the need for a hub puller and after it delivered shortly after 6pm I had no options to purchase one and get my system up and going again. I grabbed an awesome neighbor and we muscled through the old fan and with the use of a Sawall, Sledge Hammer, WD40, Screw Driver as Punch and some sweat, we got the fan blade off the old shaft without bending the blades (VERY IMPORTANT). Once this was done, I added some anti-seize gel to the new shaft (My neighbor had this) and slid the fan onto the new motor. The motor matched my existing mounting holes so I simply cut off the excess shaft so it didn't touch my compressor and installed the new unit. I wired up the system and added the new capacitor (ALSO Highly recommended, and cheap at under $5) and started the system back up. The sounds of harps and angels sang out as the cold air returned to my vents. Voila!! Now side note here that I didn't know when I originally installed the fan blade on the new unit. You have to push the blade pretty far up the shaft and close to the motor without the blades hitting the wiring & conduit going to the motor. I pushed it up just far enough to clear the compressor and left it there thinking it was good. During a recent visit by an air conditioning buddy to add some freon, he noticed my fan blade was low and air was being pushed up but some was being pushed back out through the coils below the top. He informed me that all of the hot air should be venting only through the top, otherwise the coils don't cool effectively as air isn't pulled completely through them. This was an easy fix and we moved the blade up further towards the motor (Good thing for the Anti-Seize Gel) Now all of the air was coming out of the top. Wow, what a difference. Good luck, and if your handy with tools, you can do this replacement yourself. Just follow the wiring exactly like it was, making special note of the setup including the capacitor. Crucial as electrical motors are not returnable (Due to miswire burnouts).
L**H
replacement for A O Smith 323P948
replaced my A O Smith 323P948. however you will have to cut off and grind the back side of the though bolts at least.
R**L
Easy to use even for DIY folks
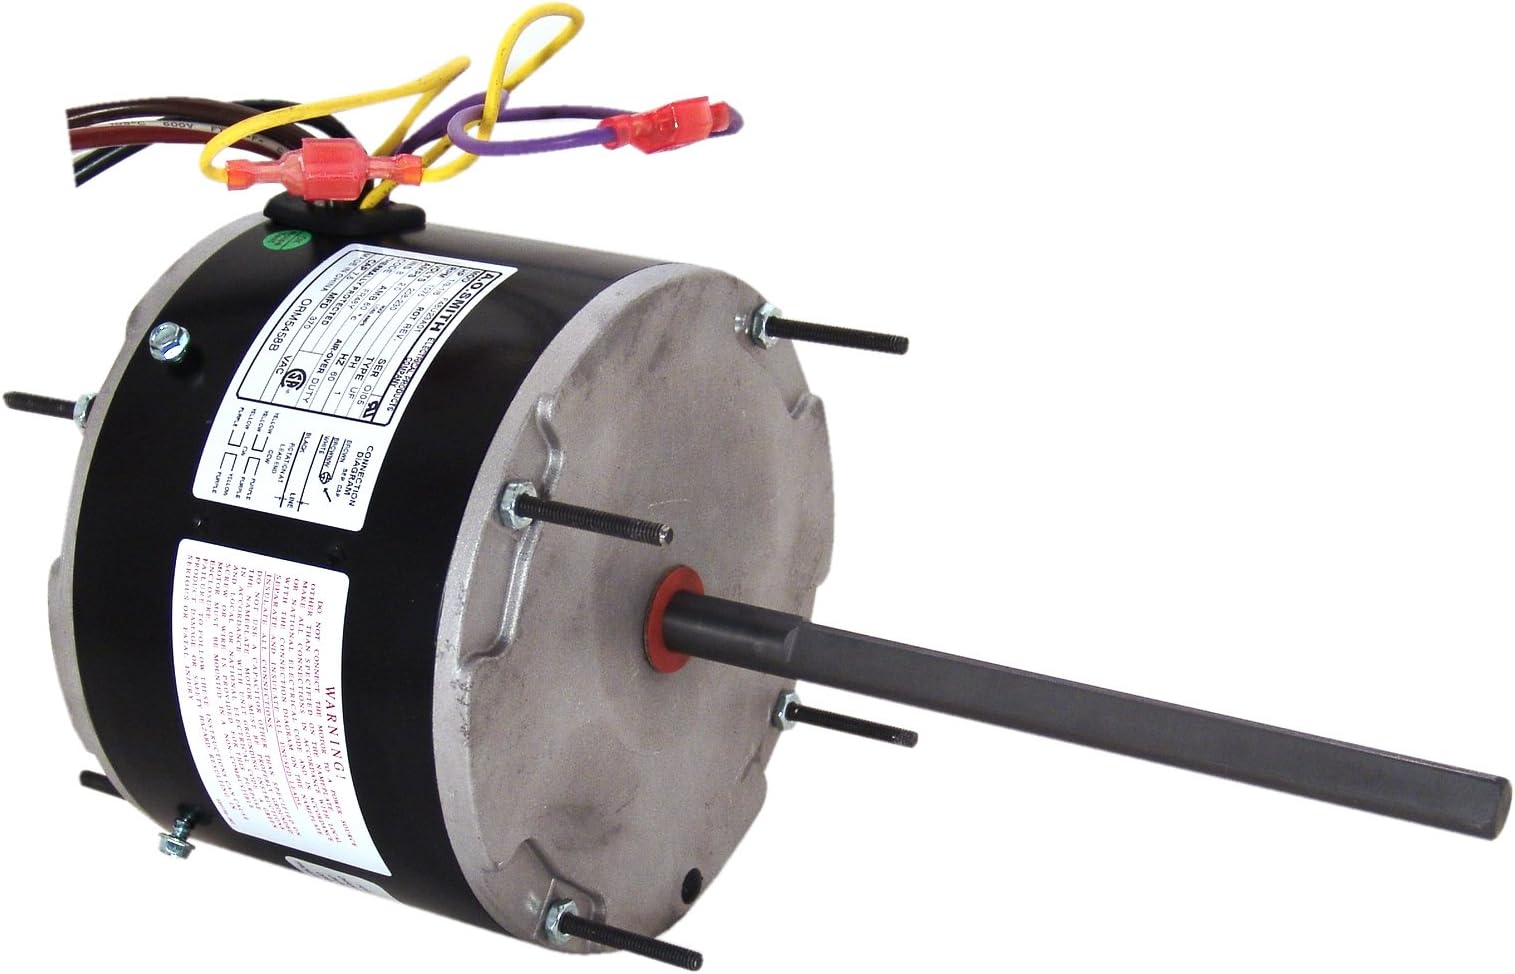
Replaced a 1/4 hp failed condenser fan motor with this model. Ordered it on Saturday via Amazon prime and it arrived before noon on Monday. Don't forget to also get a new 7.5uf capacitor (connect the brown and brown/white wires to the new cap. The most difficult part of this job by far was removing the fan hub and blades from the old motor. This taks took over 2 hours of the 3 hour total time to replace the motor. If you can order a new fan hub/blade to go with the new motor, do it. It will reduce the level of effort tremendously. 1. Turn off power at the service disconnect (typically a breaker or fuse mounted on the house near the AC unit). 2. Disconnect old motor wires from the unit. Most should be terminal lugs (capacitor) while the line power (probably white/black, or red/black, or yellow/black) is likely hardwired to the contactor relay in some fashion. 3. Lossen, but don't remove the 4 bolts securing the old fan at the top of the AC unit. 4. Flip the top over wile taking care to free the old motor wires from the electrical box. 5. With the top flipped over, lossen the inset bolt on the fan hub, and attempt to remove fan blade from the old fan motor. If it sticks, WD40 and some gentle prying should pull free it. Alternatively, use a hub puller, or purchase a new fan hub/blade so this step is not required. 6. Examine the wiring on the old fan motor and determine if it is set for Clockwise or Counterclockwise rotation. This is typically set by 4 jumper leads on the wiring harness, described on the motor's label. 7. Remove the 4 bolts securing the motor to the AC unit top, and remove the old fan motor. 8. Install the new fan motor, taking care to orient the motor with the wiring harness exciting at the appropriate angle for cable routing. Should be the same orientation as the old motor. 9. If the new motor shaft is longer than the old fan motor, use a hack saw to trim the shaft down to the same length. Be careful not to scar the shaft between the motor and the saw to prevent problems installing the fan hub/blades. 10. Lubricate the shaft lightly, and install the fan hub/blades and tighten the hub set screw. 11. Ensure that cables are properly secured in a protective covering between the fan motor and the AC unit electric box. You can connect the green ground wire to one of the screws securing the grate to the AC unit top. 12. In the electric box, connect the brown and brown/white wire to the new 7.5uf capacitor. Using a nylon wire-tie, secure the new capacitor to a suitable place in the electric box. 13. Using wire lugs or but splices, connect the white and black (line power) wires to the same wires used by the old motor. Alternatively you could connect directly the contactor (relay) output. 14. Test run. Position the AC unit top appropriately, and verify that the fan blades can spin freely with no obstructions. 15. Turn the indoor thermostat down to 60. 16. Energize the outdoor AC unit by closing the service disconnect breaker, or re-inserting the fuse. (do not touch anything on the unit while the service breaker is closed/on!). 17. Verify the fan is spinning, and check inside to verify the system is cooling. 18. Turn off service disconnect breaker and reassemble the AC unit with all the sheet metal screws etc... pay close attention to the cable routing and positioning inside the electric box. 19. Turn unit back on at the service disconnect and verify the fan still spins and the unit is cooling. 20. Done! [...]
T**R
Good motor
Worked great was exactly what I was looking for
H**C
BEWARE - BAIT AND SWITCH AND CHEAP WIRING!!
Motor delivered wasn't an AO Smith branded motor. It was a different branded model. Minus 2 stars. That is deceptive advertising! Wires on motor are not copper, they seem to be aluminum wires. Minus one star. After running for about a week, one of the yellow motor wires broke right at the connector, causing me to cut the same yellow copper wire off the old motor and splice it on to use its connector. Minus 1 star. Copper wires would not have broken. The motor is still running, and I plan to go to a storefront HVAC company somewhere and buy a quality motor with quality wiring as soon as the weather cools down. Knowing what I know now, I would not buy this again, nor recommend anyone else buy this mystery condenser motor.
D**N
Four Stars
Great replacement for older no longer available motors.
Trustpilot
2 days ago
1 day ago