


🎨 Transform your Steam Deck into a personalized masterpiece — because ordinary is overrated!
The eXtremeRate Transparent Clear Custom Faceplate Back Plate Shell is a precision-crafted replacement housing designed exclusively for the Steam Deck LCD (2022). Made from durable ABS material, this full DIY kit includes all buttons, tools, and screws needed to upgrade your console’s look with a crystal-clear finish. Installation demands technical skill, supported by a detailed video guide, making it the ultimate choice for gamers who want to stand out and protect their device with style.


| ASIN | B0C77ZPYHZ |
| Best Sellers Rank | #6,026 in Video Games ( See Top 100 in Video Games ) #1,514 in Legacy Systems |
| Customer Reviews | 4.4 4.4 out of 5 stars (363) |
| Date First Available | June 6, 2023 |
| Item Weight | 0.353 ounces |
| Item model number | QESDM001 |
| Manufacturer | Extremerate |
| Product Dimensions | 0.79"W x 0.39"H |
J**L
Very nice shell, but a complicated swapping process
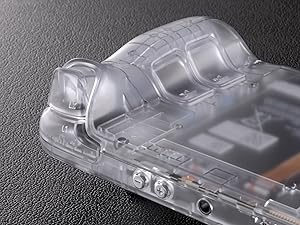
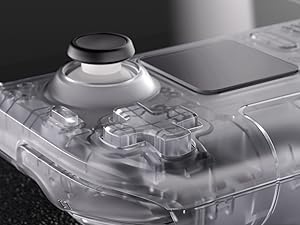
Very impressed with the quality and fit of this shell. Everything is molded exactly the same size and dimensions as the Valve shell originally. It looks great, has a fantastic feel and surface finish, the buttons all fit together perfectly and work as expected, the instructional video is *very* thorough and good. I'm particularly impressed with the detail of the shell, it includes replacement and color correct pieces for every single button, including the power/volume buttons, trackpad covers, the shoulder buttons, etc. Most of the time I've seen console replacement shells they usually only replace the "main" parts they can get away with. This is a super thorough kit! My only complaints, if any, are that the screws given with the kit are just jumbled together in a single bag and it's very difficult to tell which ones are supposed to be used where. That said - and this is absolutely no fault of the replacement shell - this is a *really* intricate process to totally disassemble the Deck. Valve made the thing pretty repair friendly, the entire console can be disassembled with screws, *except* the screen. The screen is adhesion-ed on to the console, removing it is a stressful and frustrating process, and you risk damaging/breaking the screen in a couple ways. There's also quite a few fragile ribbon cables inside with very small and finicky latches, pay attention to how the latches are flipped up and the cables removed, don't yank on them too hard! The instructional video included with the kit is REALLY good, it's also REALLY long, don't skip it, don't try and find some shortcut, spend the time to sit down and follow along. A few tips from my swap: - Keep your screws really organized, I have a magnetic screw organizer mat, but some small bowls or piece of cardboard with some tape on it also works great. Don't mix the screws up! - When you remove the screen, be VERY careful not to stick the guitar pick/spudger too far under the screen, the instruction video says "don't do more than 3mm" but doesn't explain _why_ - the ribbon cable connecting the screen's panel to it's controller is very close to one of the side edges, it's very easy to damage especially when you're jabbing in there with a metal pick to try and pry the screen loose. Damage that cable and you'll need a whole new screen!!! - Replacing the trackpad covers is the only other really difficult part, the trackpad sits on a funky wavy spring along with it's vibration motor for the haptics feedback, then the cover with the actual "tracking" part is snapped on top, there's several ribbon cables and sensitive springs around it, so go slow and take your time! Use a hair dryer or heat gun to warm up the top of the trackpad before removing it from the adhesive - Highly recommend getting a couple nicer spudgers or guitar picks for disassembly, the ones included in the kit are pretty cheap
Y**N
Amazing, and super cool look!!
I was a little scared to try and open up my my favorite handheld pc! But I built up the courage and did it. It was a long and tedious process, but it got done. The buttons feel so good, just like OEM buttons, and screws that came with the kit honestly are a very good quality. I lost a couple of my OEM and the ones that came in the kit for it perfectly! Honesty if you are thinking about getting this or another brand, get eXtremeRate! Even there videos online were easy to follow, just an FYI though, this little project will take you between 3-5 hours.
M**L
Awesome looks despite some minor flaws
Looks good, cheap in price, comes with necessary tools, and the instructions were simple enough to install. My only complaints are (1) shell cracked/split on the front/underneath the screen, and (2) the provided grip buttons don't seem to give a positive click when installed. I ended up using the black grip buttons from the original steam deck shell (had to drill them out with a 1/8 inch bit) and everything is better. I would buy this shell again and recommend it to a friend.
T**E
Stellar product
I purchased this with absolutely no experience in disassembling electronics, and was able to successfully complete this without causing any serious damage. I feel that this frame is higher quality than the stock model, and looks really nice overall. The guide video provided does an amazing job at being clear about how to safely remove pieces, or reattach them. I did have a few instances where it felt the components were easier to remove in the demonstration than they are in a stock model, but they still provided a good guide. I do have some words of advice for anyone interested in doing this themselves. 1. Keep track of your screws. I labeled and stored my screws throughout the entire process, which majorly helped when it came to reassembly. 2. Be extremely patient during screen removal, it is ridiculously scary and stressful, and much harder than it looks in the video, I would recommend buying an iOpener, as a hairdryer with the suction cup provided was simply insufficient to remove the adhesive and lift the screen. 3. Be careful when cleaning the adhesive residue off of the screen, I unintentionally scratched up my bezel, which is fortunately only a cosmetic issue, however if that matters to you, then practice hefty patience and caution at this step. 4. Be careful of your cables, multiple times I had to backtrack because I trapped cables under components. 5. Use a heat gun, hairdryer, or iOpener if any adhesive feels like it won’t come away safely, it’s not worth the risk. 6. When working on it you can put the deck face down in its case to make sure you avoid damaging the joysticks. Finally, I found this project to be fun and well worth the effort, but I would not recommend it to anyone who is impatient, or can’t handle stress well. I spent about 7 hours working on this, and I would recommend anyone attempting to do this to prepare for even longer.
B**E
Honestly this is one of the best shells I've come across, let alone for the Steam Deck. It feels great, looks fantastic and fit together arguably better than the stock shell. Mine creaked when the shell was pressed below the screen and this one didn't, so clearly done something better than Valve to sort that out! I did keep the original buttons though as it looks quite cheap going with all purple - but that's just me. The kit had everything you need to swap and Extreme Rate have a YouTube video that was really well done and easy to follow, so I'd recommend watching that like I did. I can't fault it and whilst this isn't a reflection on the shell, it's definitely not for the feint of heart. You take everything apart, including the screen (which I'd never done before) so I wouldnt do it as your first ever shell swap. If you do though, watch their video, take it slow and keep track of which screws go where so you don't ruin any of the posts with the wrong screws. My tip: I used several egg pots and scrap paper to say what they were - worked well!
J**J
Die Qualität der Plastikteile ist wirklich gut, alles passt perfekt zusammen. Der Hersteller hat auf der Webseite eine sehr gute Videoanleitung verlinkt, mit der alle Schritte erklärt sind. Das Ergebnis sieht wahnsinnig gut aus und erfüllt alle Erwartungen meiner 2000er-Nostalgie :) Der Umbau ist jedoch nichts für schwache Nerven - ich schraube viel, entwerfe selbst Platinen usw. Man darf sich auf ca. 4 Stunden Schrauberei einstellen. Das Steam Deck ist eine wirklich komplexe Konsole (hut ab an die Produktdesigner von Valve!) und man muss verdammt viele kleine Teile ausbauen - man zerlegt die Konsole hier 100% in die Einzelteile, da bleibt nichts mehr beisammen. Meine Empfehlung: Man sollte neben den gelieferten Materialien noch einen einstellbaren Föhn oder besser eine Heißluft-Lötstation mit Temperaturregelung haben, um das Display und ein paar weitere verklebte Komponenten zu entfernen. Zudem ist etwas Reinigungsalkohol (IPA o.ä.) für die Klebereste am Display hilfreich. Eine Handvoll Gitarrenplektren machen das entfernen vom Display auch nochmal einfacher als nur das einzelne mitgelieferte Metallblättchen. Unbedingt beachten: Ihr entfernt den Kühler vom SoC des Steam Deck. Ihr solltet auch ein wenig neue Wärmeleitpaste haben um diese neu aufzutragen. Meine war schon arg zerbröselt und konnte nicht wiederverwendet werden, habe aber mein Steam Deck auch schon seit Launch. Mit sehr neuen Steam Decks ist die WLP evtl. noch flüssig genug um neu verwendet zu werden. Ich bin sehr zufrieden. :)
R**O
Molto accurato calza come un guanto, occorre il giusto tutorial per le operazioni di assemblaggio. Ottimo prodotto
B**E
La coque est vraiment jolie et de très bonne qualité. Le tutoriel fourni par l’entreprise est clair, et avec iFixit, l’installation se fait vraiment facilement. Franchement, c’était presque un jeu d’enfant. Très satisfait, je recommande !
S**A
Es mi segunda vez cambiando la carcasa, fue mas facil que la primera, se le pierde el miedo jaja, pero como experiencia recomiendo dejar los botones originales sobre todo el de encendido, los botones y trackpads llegan a rechinar y por algun motivo el trackpack no vibraba correctamente por un mal corte en el plastico asi que tuve que lijar, y el boton de encendido tenia sus fallas como tener que presionar muy fuerte y que aveces tenia que presionar varias veces, abrirla solo para cambiar el boton de encendido es tedioso jajaj, esta vez deje botones, trackpads y gatillos originales, aunque eso ya sera gusto de cada quien, los tornillos siguen siendo un dolor de cabeza ya que el video te muestra algunos que no hay y poner un tornillo equivocado implica que se barra la entrada del tornillo, yo recomiendo usar los tornillos originales, una pistola de calor es obligatorio pero cuidado con poner mucho calor sobre la pantalla, para despegar los Trackpads recomiendo poner calor, la primera vez estan muy pegados y no salen tan facil como en el video jaja
Trustpilot
2 weeks ago
2 months ago